« Back to blog
EasyRoutes 101: Managing Drivers & Seats
Learn how EasyRoutes driver seats work; how to add, activate, or edit your drivers; dispatch and assign routes; and how prorated billing can help support your busiest delivery periods.

Learn how EasyRoutes driver seats work; how to add, activate, or edit your drivers; dispatch and assign routes; and how prorated billing can help support your busiest delivery periods.
Welcome to EasyRoutes 101! This article answers some of the most frequently asked questions about managing your EasyRoutes drivers & driver seats, as well as outlining the basics of assigning and dispatching routes to your drivers (or yourself!). Read on to learn how EasyRoutes' flexible seat model can streamline your local deliveries, especially during the busiest times of the year.
Instead of paying for individual drivers, with EasyRoutes you just pay for a driver seat and can put any driver from your roster into that seat. For example, you could have a plan with two driver seats, but have four drivers in your driver roster. You can easily change which two drivers are active at any given time.
You can add, remove, and switch drivers and seats in your plan at any time, and as frequently as is necessary to suit your delivery schedule. If you end up only using additional driver seats for a portion of the month, we’ll prorate your monthly subscription charge and issue applicable credits to only cover the days the additional drivers were active - more on this at the bottom of the article!
Access all driver management options discussed in this article from the EasyRoutes navigation menu > Drivers & Vehicles tab:
.webp)
From the Drivers & Vehicles tab, click the Manage seats button in the upper right-hand corner of the page:

A modal will pop up to select the number of driver seats you would like included in your plan. Click Update to save your new number of seats:

Invite a driver to deliver for your store by entering their phone number into the Invite Driver form in your EasyRoutes settings. If you are doing your own deliveries, you can enter in your own phone number to share routes with yourself!
From the Drivers & Vehicles tab, click the Invite Driver button:

A modal window will appear. Enter in your driver's phone number and click the Invite Driver button:

This driver will now be added to your store as Pending Signup until they download the EasyRoutes Delivery Driver app for iOS or Android, and set up their driver account:

After their driver account has been set up, their name will appear in your list of drivers for you to activate when you are ready to assign them to a route:

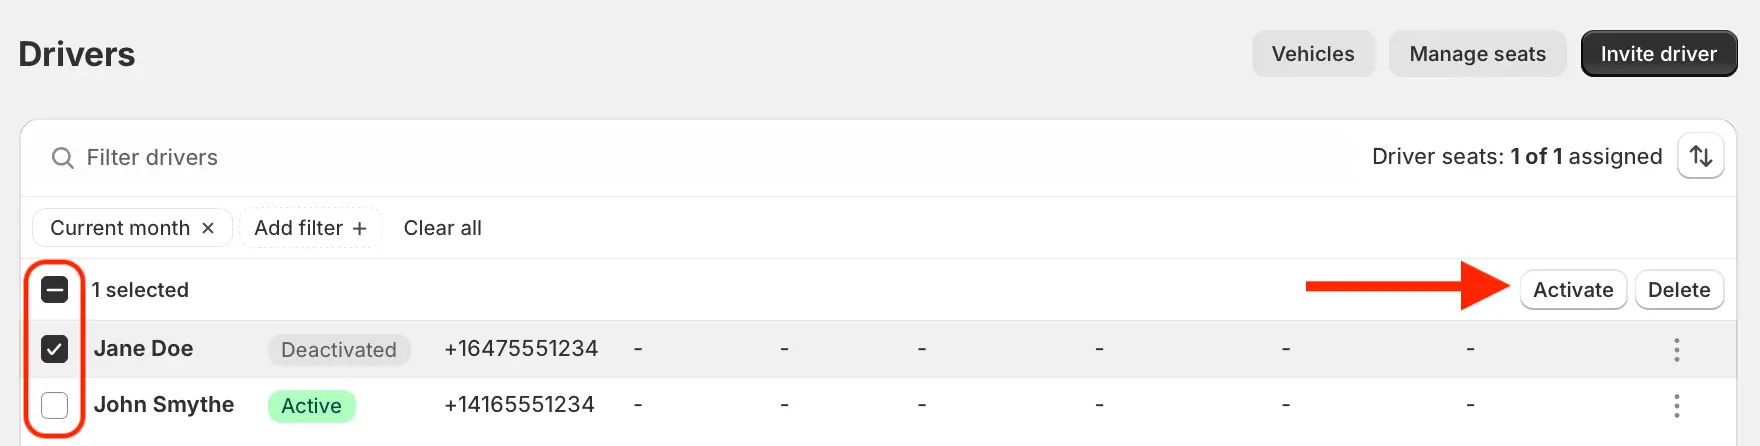
In order to assign or share a route with your driver(s), you'll need to activate them first.
From the Drivers & Vehicles tab, select the driver(s) you want to activate by clicking the checkbox next to their name(s). This will pop up the Actions menu in the upper right-hand corner of the table; click the Activate button:
Click the Save button in the top-right to apply your changes. If applicable, you will be taken through the process of updating your monthly plan to account for any new additional active drivers. Once complete, EasyRoutes will refresh and you can now select your new active drivers when assigning and sharing routes.
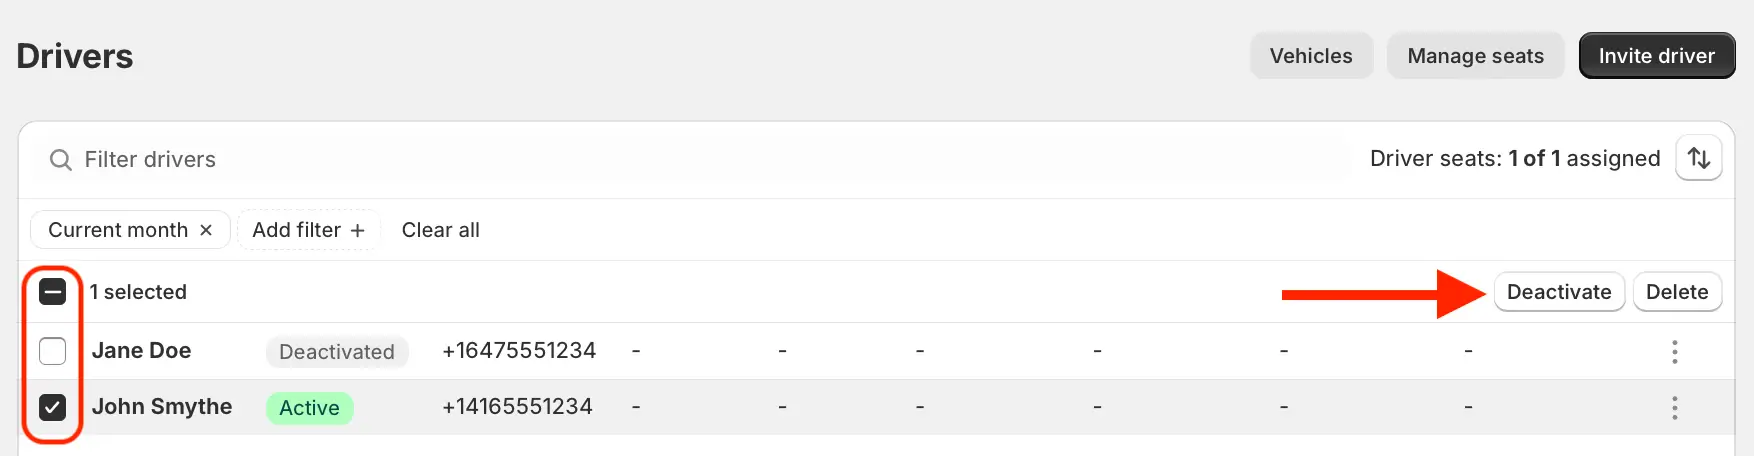
From the Drivers & Vehicles tab, select the driver(s) you want to deactivate by clicking the checkbox next to their name(s). This will pop up the Actions menu in the upper right-hand corner of the table; click the Deactivate button:
Click the Save button in the top-right to apply your changes. Once complete, EasyRoutes will refresh and you will no longer be able to dispatch routes to deactivated drivers. You are still able to assign routes to deactivated drivers to aid in future route planning.
You can assign a route to any activated or deactivated driver in your store. However, in order to actually dispatch the route, you will need to have at least one driver currently activated.
At the top of any route you create, you'll find the route header where you can rename your route, schedule it, and assign it to a driver:

Click the Driver dropdown box and a list of drivers will appear. Select one to assign that driver, or click Manage drivers to quickly jump to your list of active and deactivated drivers.
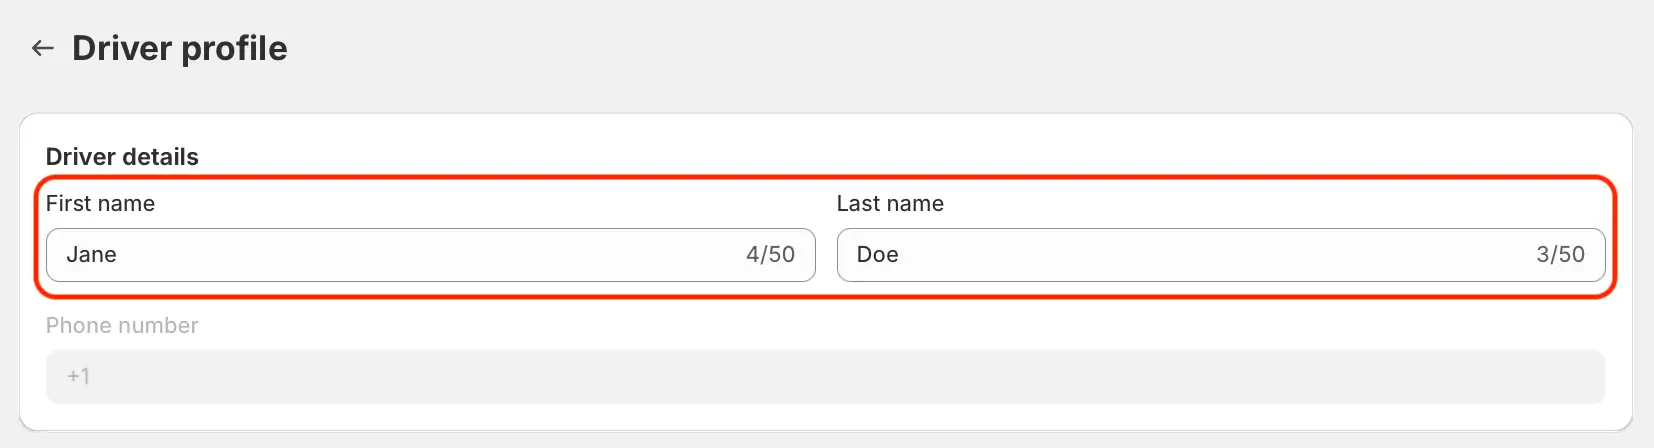
Driver names can be edited directly from the Drivers & Vehicles tab, first by clicking the name of the driver you'd like to update. Input the driver's new name in the First & Last name boxes provided:
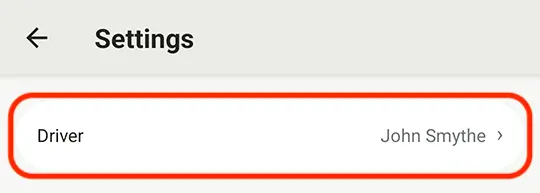
Drivers can also update their configured name from the mobile app, first by tapping the gear icon in the top right corner of the app to access app settings:

At the top of the settings page, you'll find the driver name currently associated with this account. Tap on it to edit this driver profile:
Once you’ve made your changes, tap the Update link in the upper right-hand corner of the screen to save them.
With EasyRoutes you can assign a route to a driver as detailed above; you can also generate a Dispatch Link to deliver routes yourself, or allow your drivers to assign routes to themselves.
Dispatch Links can be shared with any driver added to your store - they can then preview the route and claim it if they want to assign themselves. Deactivated drivers can also claim a route if there are empty driver seats available.
Note: Drivers must be added to your store to be able to see unassigned routes for your store and to claim any of these routes.
To generate a Dispatch Link, go to the route you want to dispatch and click the Dispatch Route button in the top-right without selecting a driver from the drop-down menu:

A modal window will pop-up. This window will inform you whether you have any driver seats available or not. Click the Dispatch button when you are ready to create your link:

After you click the button, the modal window will now display a Dispatch Link:

We provide some buttons to help you quickly share this link. When you are done, click the Done button.
Your driver can open their EasyRoutes app to see all unassigned routes in your store that are dispatched and claim the route:

When a driver claims this route, EasyRoutes will display that driver’s name in the Driver Assignment drop-down menu.
To stop sharing a route, click the Dispatched button to open this modal again, and click the Stop Sharing button. Drivers will no longer be able to access this route or assign it to themselves.
As a part of any paid plan, you pay for a number of driver seats in a monthly plan, and you can put any driver in your roster into that seat. For example, if you have two active drivers, and you have four drivers in your roster, you can manage and change which two drivers are using your seats (e.g. activated) at any given time.
Our plans are flexible: you can also add seats briefly to scale up and scale down based on your demand. For example, let's say you have a busy delivery period for Mother's Day weekend. You can add seats (upgrade) to activate the additional drivers for that weekend, and then deactivate them after, and remove the seats (downgrade). We'll prorate your plan for the days used in that scenario -- this Shopify Help Center article describes the mechanics of prorating on EasyRoutes for Shopify:
"If you upgrade or downgrade your subscription with an app, then the app will prompt you to agree to a new recurring app charge. This is because Shopify allows each app only one recurring app charge to be enabled at a time. The existing recurring application charge will be canceled and replaced by the new charge.
Depending on the app, the new recurring app charge is either applied immediately, or after the app's current billing cycle ends.
If the new app charge is applied immediately, then when you upgrade your plan by moving from a less expensive charge to a more expensive charge, the charge is prorated based on the difference in price and the number of days remaining in the billing cycle. For example, if you begin a 30-day billing cycle on a $5.00 plan, and upgrade to a $15.00 plan on day 15 of the billing cycle, then you're charged $5.00 + ($15.00 - $5.00) * (15/30) = $10.00 USD.
If the new app charge is applied immediately, then when you downgrade your plan by moving from a more expensive charge to a less expensive charge, you're automatically offered an application credit based on the difference in price and the number of days remaining in the billing cycle. This application credit can be used towards any future application purchase on Shopify."
This Stripe support article describes the mechanics of prorating driver seat upgrades or downgrades on EasyRoutes for Web:
"When a subscription is upgraded, Stripe will automatically calculate the prorated amount that the customer owes. For example, if a customer is moved from a US$10.00/mo subscription price to a US$100.00/mo subscription price in the middle of their billing cycle, they are owed a US$5.00 credit for the first price and they owe US$50.00 for the new price. This means that they owe a total of US$45.00 for the subscription upgrade. This amount can be charged at the end of the billing cycle or immediately by creating an invoice.
When a subscription is downgraded or cancelled, the customer may be owed a credit. If a customer moves from a US$100.00/mo subscription price to a US$10.00/mo subscription price in the middle of the billing cycle, they are owed US$50.00 for the first price and owe US$5.00 for the new price. A total of US$45.00 is now owed to the customer for the subscription downgrade, and that credit ends up being added to their credit balance to be applied to future invoices."
When using EasyRoutes for Shopify, there are two periods to account for on a Shopify bill:
For a 30-day billing cycle, you may see charges and events related to two subscription cycles, but only inclusive of the dates for the billing cycle:

In general, upgrades and downgrades are processed against a 30 day subscription cycle, and Shopify works by creating charges and credits against the remainder of the 30 day subscription cycle. To note, events that happen after the invoice date would appear on the next invoice, but for the same subscription cycle.
Upgrades will be shown as charges in the Apps section of your Shopify bill. Downgrades will be shown under the Credits section of your Shopify bill.
For a regular monthly subscription, you'll see a charge for the full 30-day cycle for the price of the plan at your current number of seats. If a subscription is cancelled in this cycle, then this is the final charge for the subscription plan.
For upgrades on both EasyRoutes products, you will see a charge for the difference from the previous plan, prorated to the remainder of the remaining 30-day cycle from the upgrade date (e.g. if the new app charge is applied immediately, then when you upgrade your plan by moving from a less expensive charge to a more expensive charge, the charge is prorated based on the difference in price and the number of days remaining in the billing cycle.)
For downgrades on both EasyRoutes products, you will see a credit for the difference from the previous plan prorated to the remainder of the 30-day cycle from the downgrade date (e.g. If the new app charge is applied immediately, then when you downgrade your plan by moving to a less expensive charge from a more expensive charge, the credit is prorated based on the difference in price and the number of days remaining in the billing cycle).
Note: if you have a bill or an invoice based on a billing threshold, upgrade or downgrade events that happen after the invoice date would appear on subsequent invoices for the same subscription cycle.
Still have questions about managing your drivers and seats? Search the EasyRoutes support portal for answers in a flash, around the clock; check out the Managing Drivers section of the support portal for more driver-specific articles; or reach out to the Roundtrip support team if you require any further assistance. Happy delivering!
Written by: Joe Snyder
EasyRoutes is the AI-native delivery operations platform trusted by 5,000+ businesses across 75+ countries. Plan routes in seconds, dispatch drivers automatically, and delight your customers — from Shopify or any order source. Experience delivery operations that run themselves. Rated 4.8 stars and certified Built for Shopify.
⭐⭐⭐⭐⭐ 4.8 stars • Trusted by 5,000+ Businesses