Learn how to configure the EasyRoutes Delivery Driver mobile app; how to use the app to navigate, deliver stops, and access route inventories; and how to maximize customer satisfaction with Proof of Delivery features.
Welcome to EasyRoutes 101! This article outlines all aspects of configuring and delivering with the EasyRoutes Delivery Driver mobile app, an essential tool for your drivers to complete their delivery routes quickly and efficiently.
Note that EasyRoutes Delivery Driver is the companion app for EasyRoutes, a Shopify and web app designed for merchants and service providers to plan their own deliveries. These businesses create delivery routes and share them with drivers or couriers that they employ or have contracted deliveries out to. EasyRoutes is not a platform for drivers where you can sign up as a driver to take jobs directly.
Installing & signing in to the mobile app
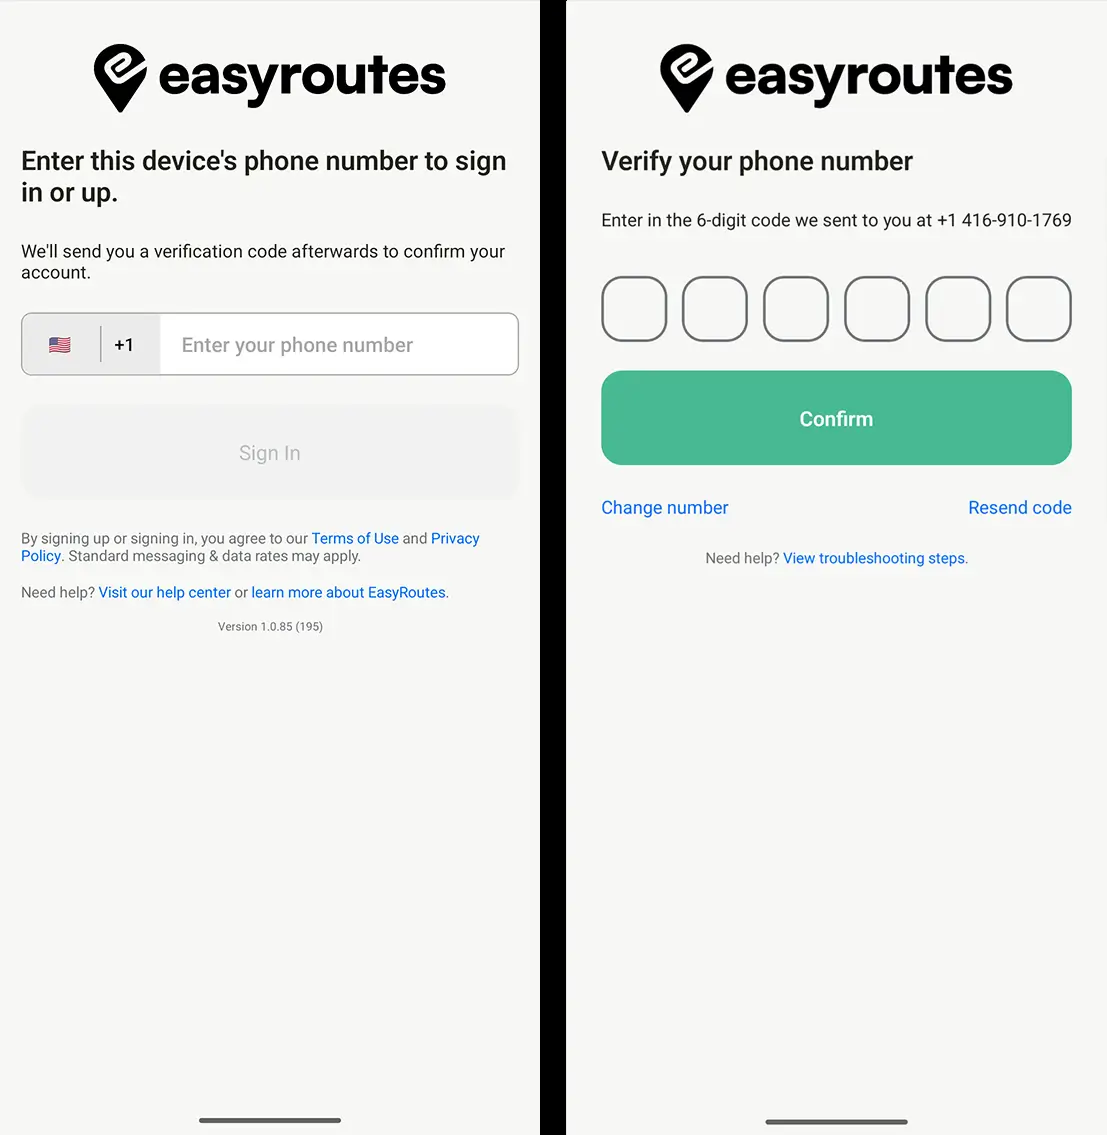
If you've been invited to deliver by a shop using EasyRoutes, first download EasyRoutes Delivery Driver for iOS from the App Store, or for Android from the Google Play Store. When you open EasyRoutes initially, you'll be presented with a screen where you can enter your device's phone number to sign in or sign up for EasyRoutes Delivery Driver (below, left); once you've done that, we'll send a confirmation code via SMS to the number you entered - input that code on the following screen (below, right):
Once your phone number has been verified, you'll be prompted to create a driver account - input your details and tap Complete Signup to finalize your registration:
Mobile app configuration
EasyRoutes provides a number of settings to customize the Delivery Driver app to suit your specific delivery workflows. From your EasyRoutes Settings > Routes tab, access the Route display options section:
Any variables that are enabled here will display their corresponding column when viewing any Route page in EasyRoutes. Variables that are active here will also display the same information to your drivers on the mobile app, so be sure to unselect any checkboxes your drivers do not require access to.
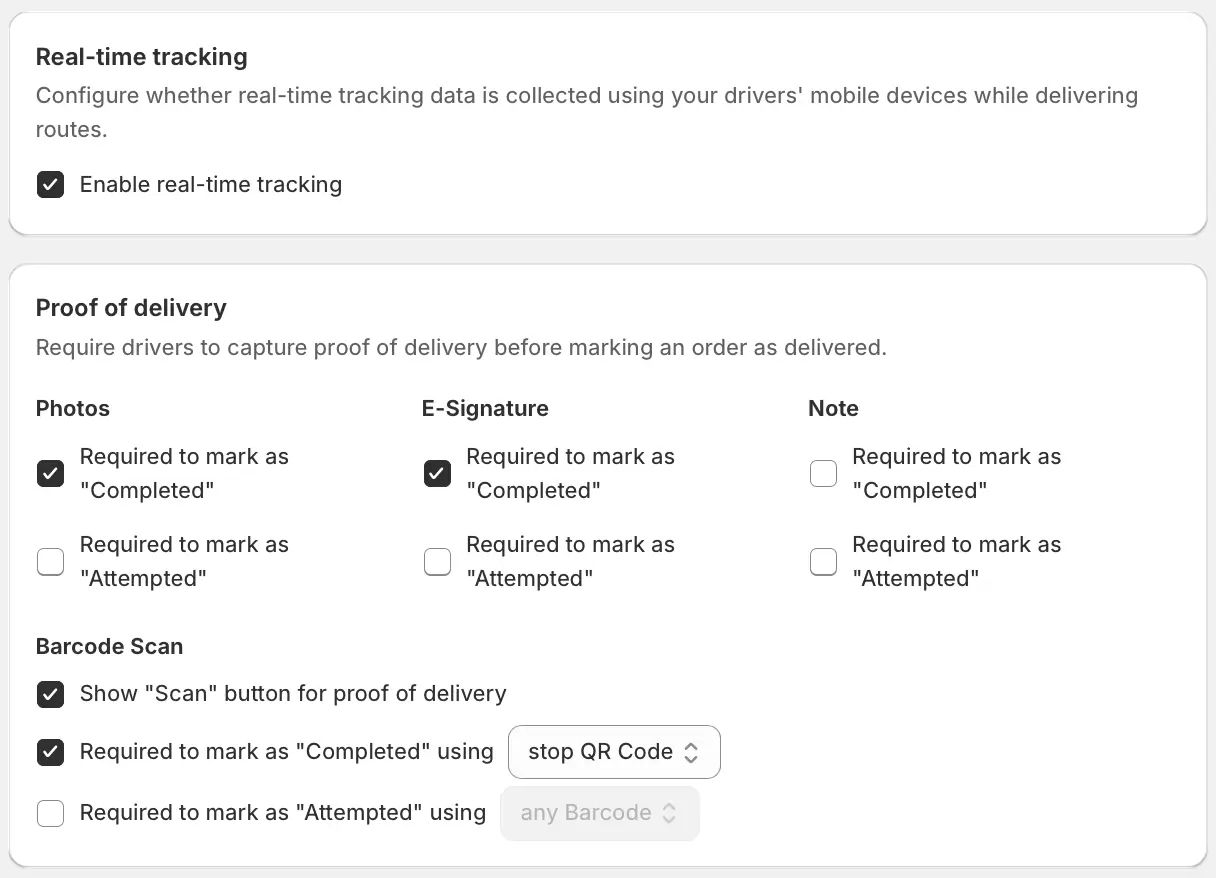
From your EasyRoutes Settings > Driver Settings tab, we can configure the rest of the settings that apply to the mobile app:
Real-time tracking: Enable this option if you'd like to be able to track your drivers' live GPS location when delivering active routes, or share this location with customers when their driver is getting close.
Proof of delivery: Enable these options if you'd like to require that drivers upload any/all of the available Proof of Delivery items, before being able to mark a stop as Delivered or Attempted.
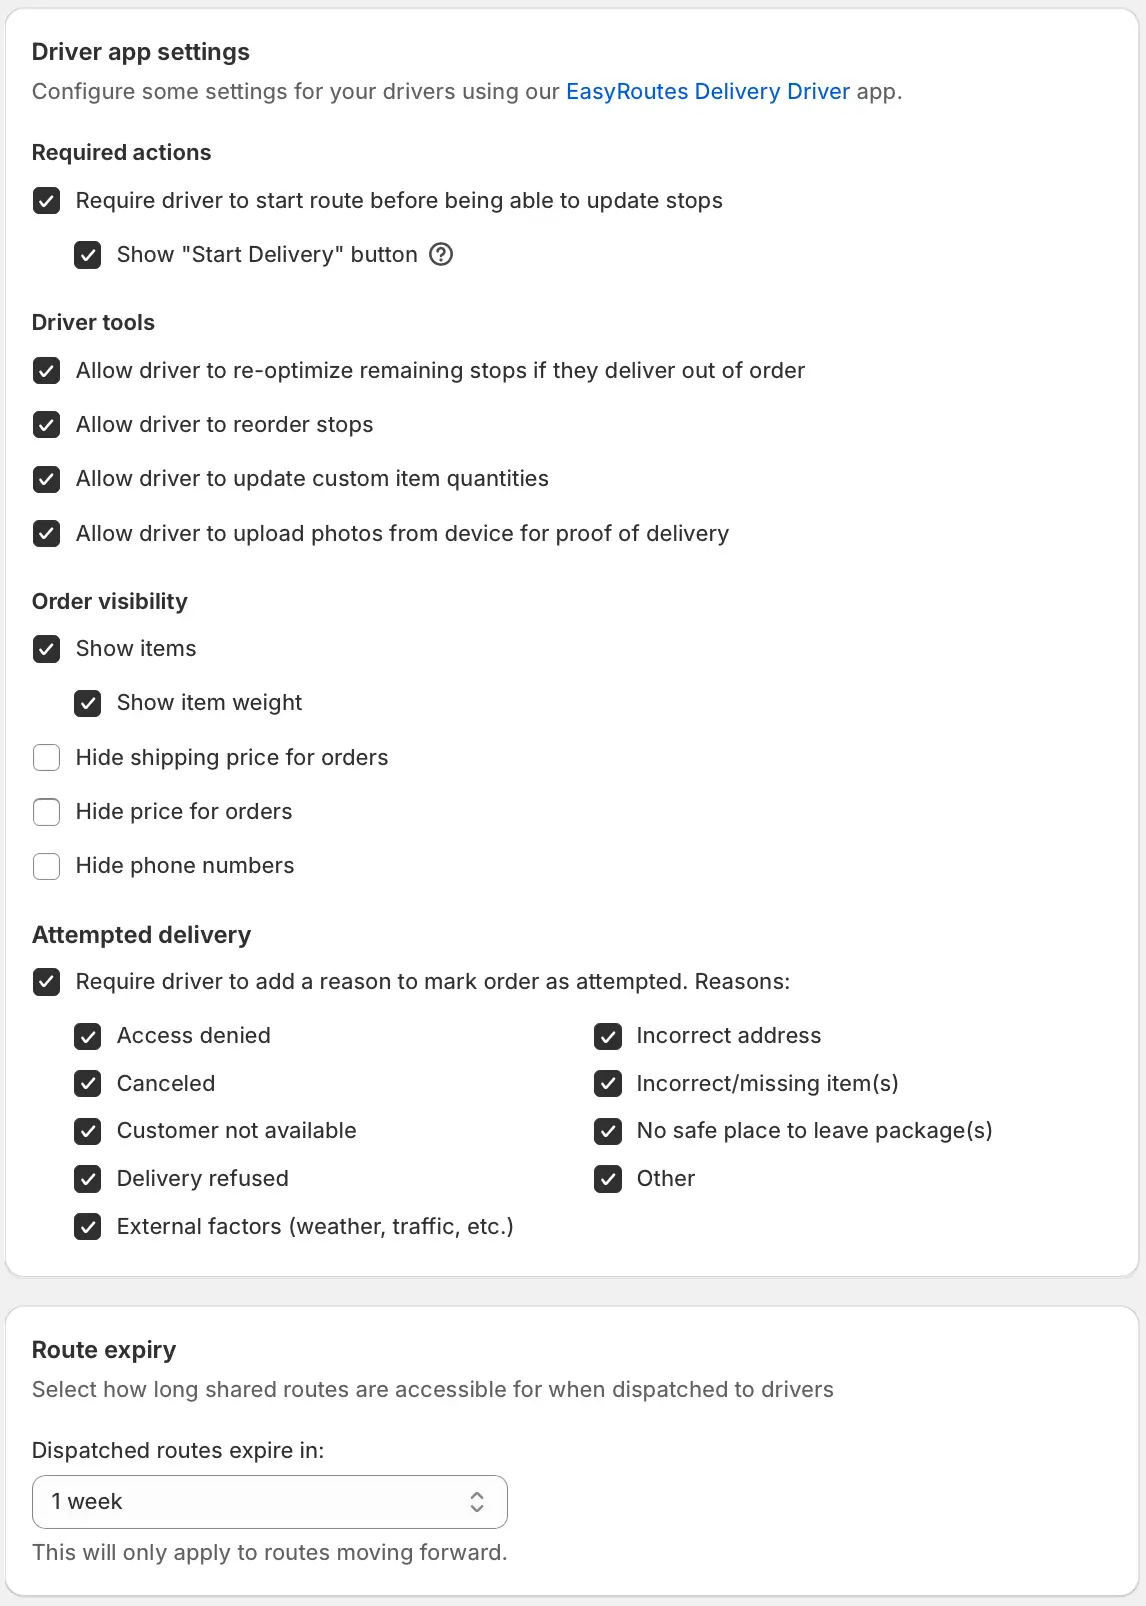
Driver app settings: These settings determine what information drivers will have access to, and what additional route permissions/activities they can perform via the mobile app:
Show "Start Delivery" button: When enabled, gives drivers the option to start their route, sending Out for Delivery customer notifications. If you mark orders as Out for Delivery manually, this setting should be disabled.
Require driver to start route before being able to update stops: When used in combination with the above option, ensures that drivers cannot mark stops as Delivered or Attempted until they've started their route. This can help avoid situations where customers receive Delivered notifications prior to Out for Delivery notifications, which are triggered by the Start Delivery button.
Allow driver to re-optimize remaining stops if they deliver out of order: When enabled, gives drivers the option to manually re-optimize their routes when they deliver steps out of their initially optimized order. Route planners are still able to re-optimize routes from EasyRoutes itself at any time.
Allow driver to reorder stops: When enabled, drivers can manually shift stops up and down within their dispatched routes, directly from the mobile app.
Allow driver to update custom item quantities: When enabled, drivers will be able to edit line item quantities for custom and/or imported stops directly from the mobile app.
Allow driver to upload photos from device for proof of delivery: When enabled, drivers will have the option of selecting photos from their device library to use as proof of delivery - particularly useful when completing routes where mobile data is unavailable.
Show / Hide settings: Configures the visibility of a number of variables within the mobile app, but maintains their Route page column visibility (if enabled).
Attempted delivery settings: Enable the Require driver to add a reason to mark an order as attempted setting to ensure drivers must include a reason before being able to successfully mark an order as attempted. Each of the checkboxes below this can be disabled to remove individual preset options that drivers can select from as an attempted delivery reason.
Route expiry: Configure this setting to determine how long routes can be accessed by drivers once dispatched, anywhere from 24 hours to 4 weeks.
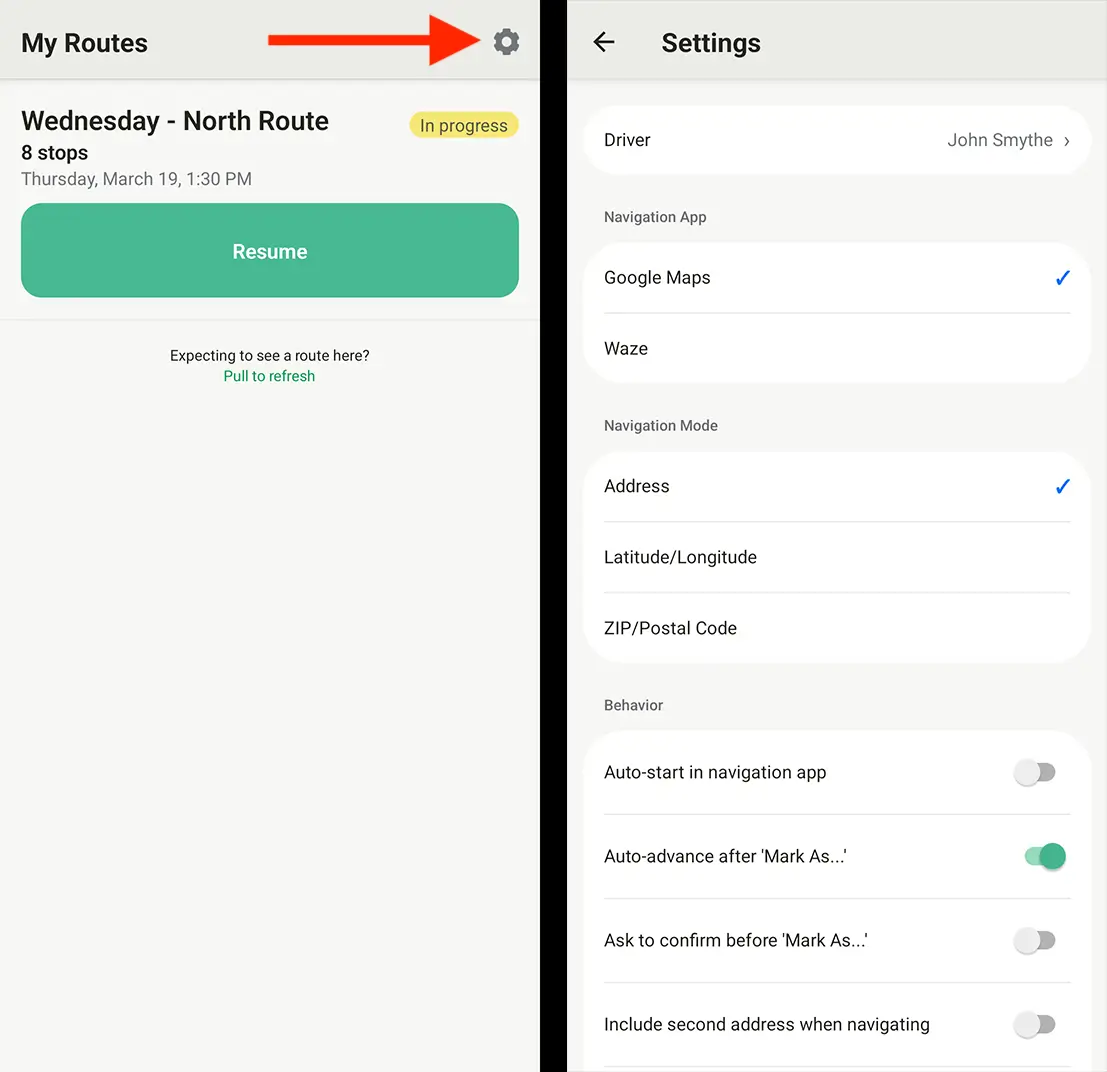
There's a few additional settings that can be updated from the Settings page of the mobile app homepage:
Driver: Tap your driver name to update the profile associated with this phone number, or to delete your driver account.
Navigation app: Select which app launches when navigating to a stop.
Navigation mode: Select which set of order location coordinates are passed on to the navigation app; read more on troubleshooting navigation issues at this support article.
Auto-start in navigation app: When enabled, EasyRoutes will attempt to trigger and start the navigation mode for your navigation app when you press the navigate button.
Auto-advance after "Mark as...": When enabled, EasyRoutes will switch to the next stop after 5 seconds once you have marked an order as delivered or attempted (bypassing the stop summary screen).
Ask to confirm before "Mark as...": Displays an additional pop-up warning to confirm any "Mark as..." delivery actions.
Include second address line when navigating: Include available "Address 2" fields when passing coordinates to the navigation app; effectiveness will vary depending on the quality of Google Maps data in your locale.
Warn when updating a stop from far away: When enabled, will provide a warning to drivers indicating their GPS location is not in close proximity to the stop they're trying to update a status for.
Address header on a stop is sticky: When enabled, keeps the address details for a stop "stuck" to the top of the screen when scrolling through the stop's page.
Sort stop items alphabetically: Sorts any item views in alphabetical order instead of the default order as listed in the EasyRoutes admin view.
Viewing assigned or dispatched routes
When a business using EasyRoutes creates a route and dispatches it to you, you'll receive a push notification message with a shortcut link to your shared route:
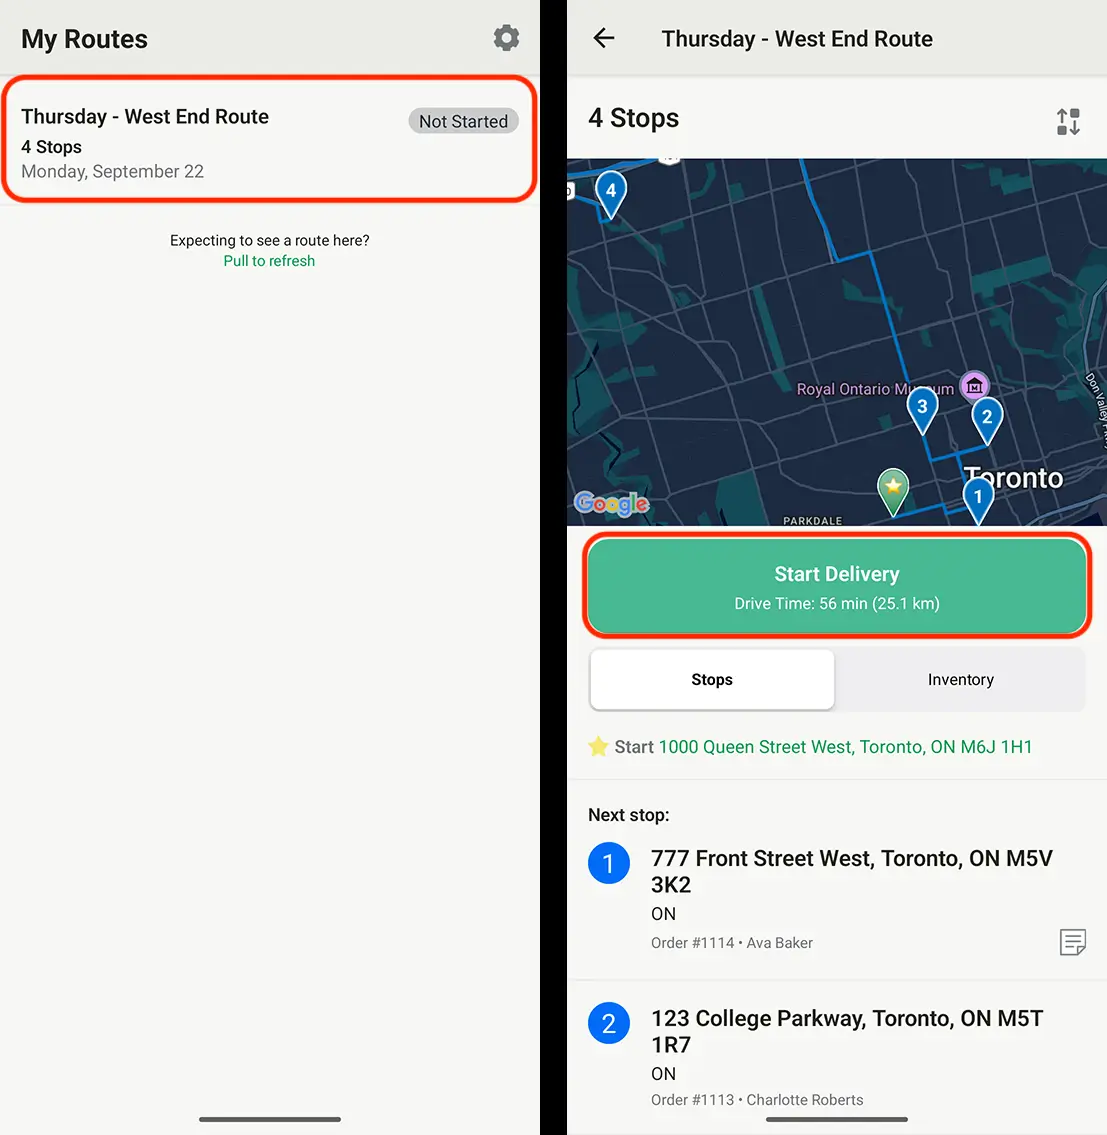
This route will also be added to your list of routes on the mobile app's homepage, along with any other routes that are assigned to you - tap any route in the listing to access it, then tap Start Delivery to begin delivering a route:
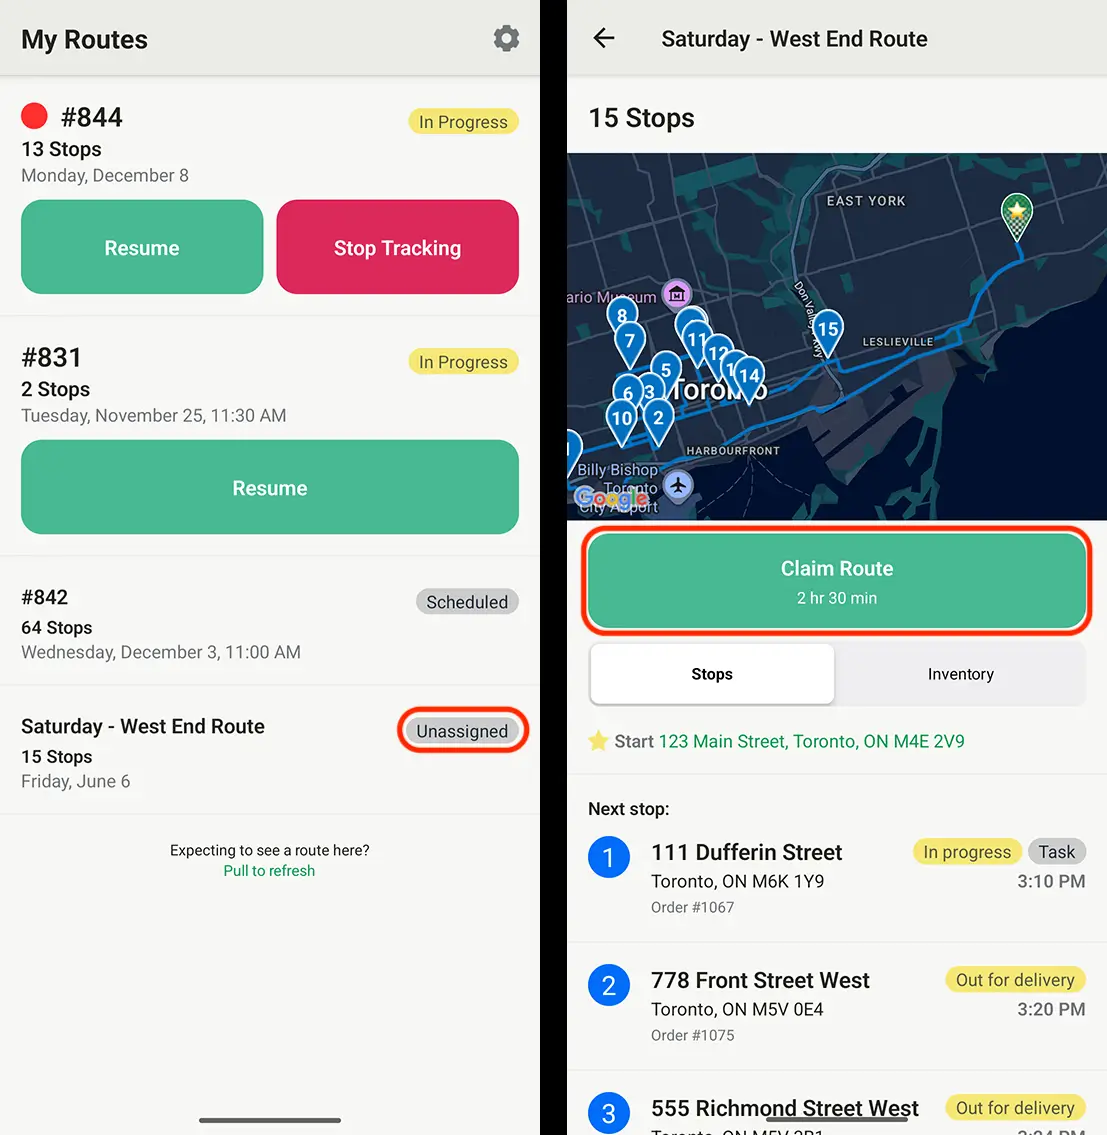
If any routes have been dispatched without an assigned driver, you may also be given the option to claim them. If any unassigned routes (indicated via the Unassigned badge below, left) are listed in your app, tapon one, then Claim Route to self-assign yourself to that route:
EasyRoutes generates an inventory for each route that can also be used as a packing checklist before departing for deliveries. This inventory provides an overview of every item needed for the entire route, as well as individual stops. When viewing a route, scroll down below the map and tap the Inventory slider - you'll have three options for displaying inventories:
Summary View: the default inventory mode, displays individual items and their quantities required for the entire route - tap Show order items to switch to...
Items View: a summary of each item required for the entire route, as well as the quantities of each item, and the stop or order it's associated with - tap Show by order to switch to...
Order View: each stop (in routed order) and the individual items and quantities required per stop - tap Show summary to switch back to the default Summary View:
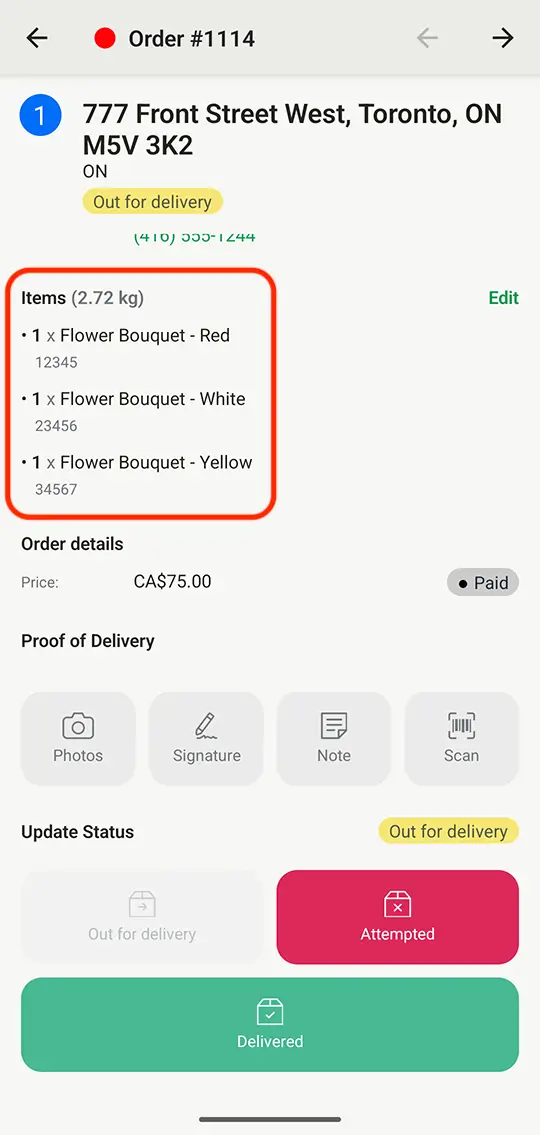
Once a route has been started, you'll also have access to the inventory for each stop from the Items section, located just above any Delivery Instructions and the Proof of Delivery tools:
Navigating & delivering stops
From the app's homepage tap View Route on any route you've been assigned or have claimed; tap Start Delivery and you're on your way! The app will automatically display the first stop in your route, and you can tap the Go To buttonto open your navigation app of choice and get directions to the stop.
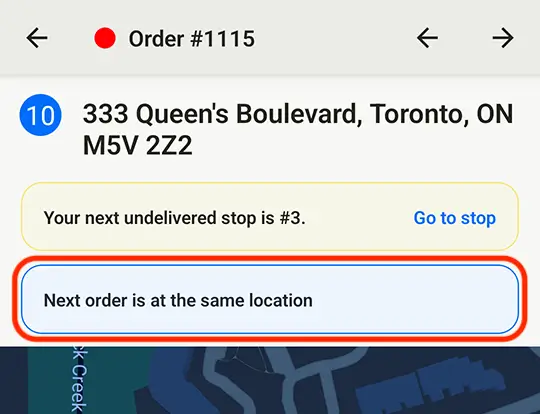
EasyRoutes will let you know if more than one order is at the same location. This is visible above your map when viewing a stop:
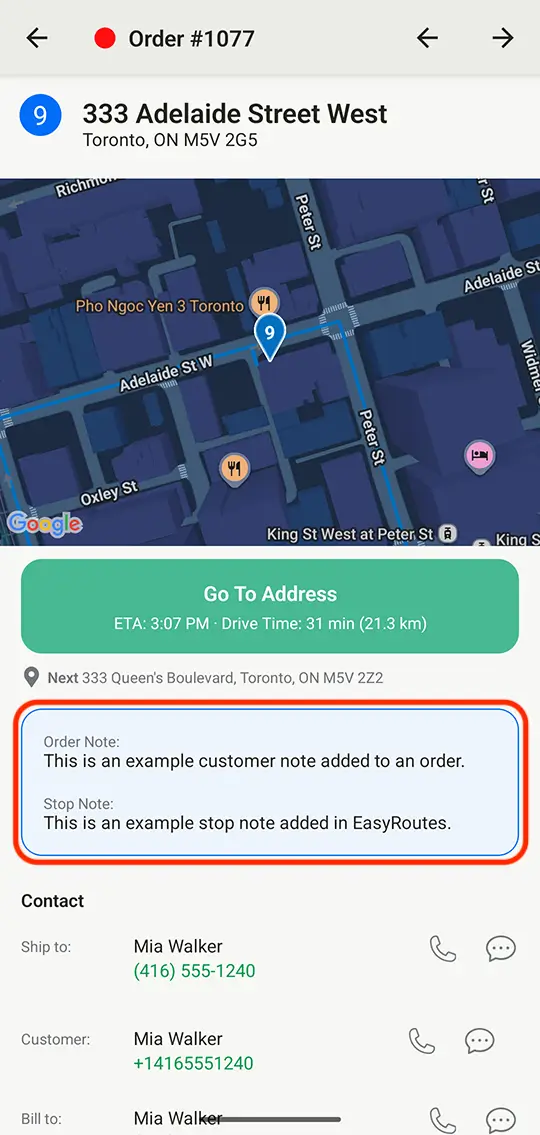
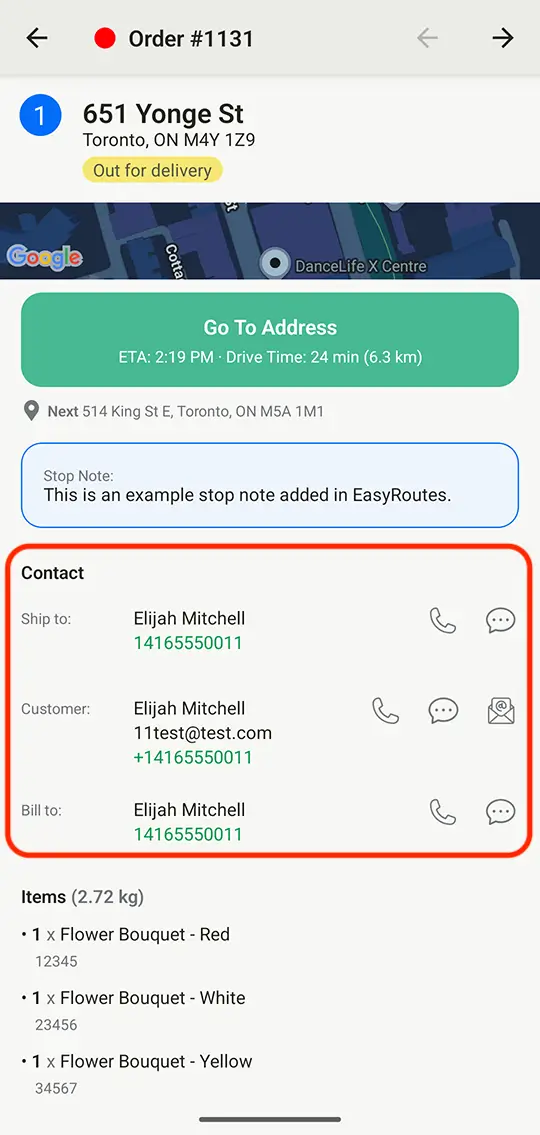
Any available Order notes, Stop notes and/or Customer notes associated with the stop will be listed below the map:
Any applicable recipient and customer information will be listed next, with shortcuts to contact them by call, text, or email if required:
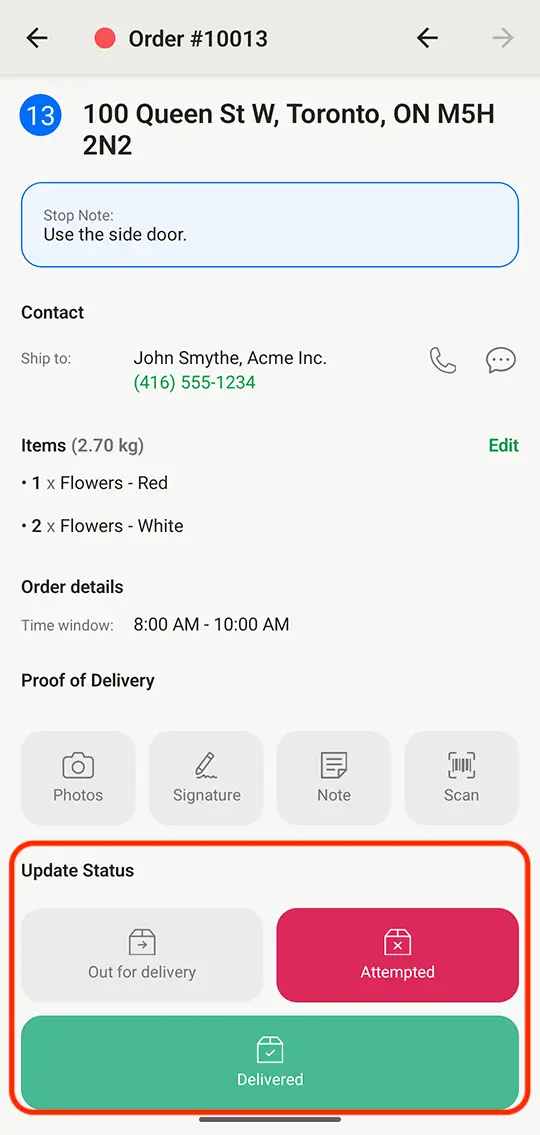
Just below the Proof of Delivery tools, you'll find the Update Status section - tap the applicable button to mark the stop as Attempted or Delivered, and the app will prompt you to move on to the next stop in your route:
Note that the "Mark as..." buttons may be disabled (greyed out) if any Proof of Delivery items have been configured as required as described above. As soon as the necessary Proof items are uploaded for this stop, the buttons will become active and you can continue your route. Speaking of Proof of Delivery...
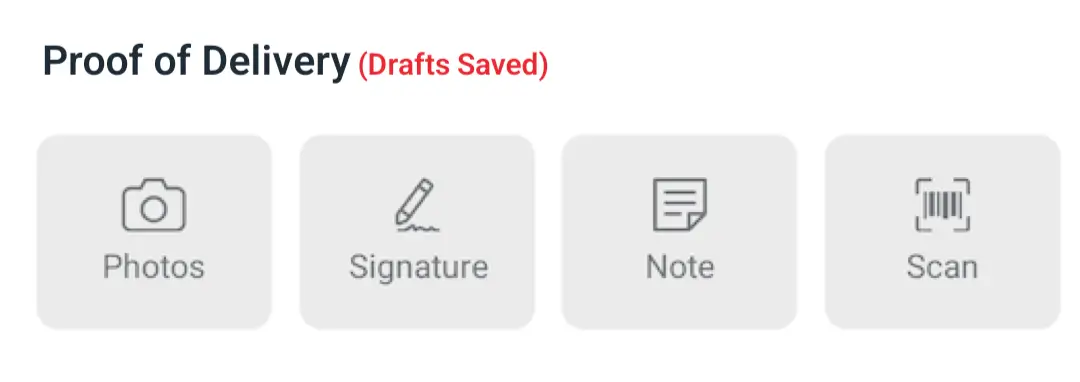
Capturing Proof of Delivery
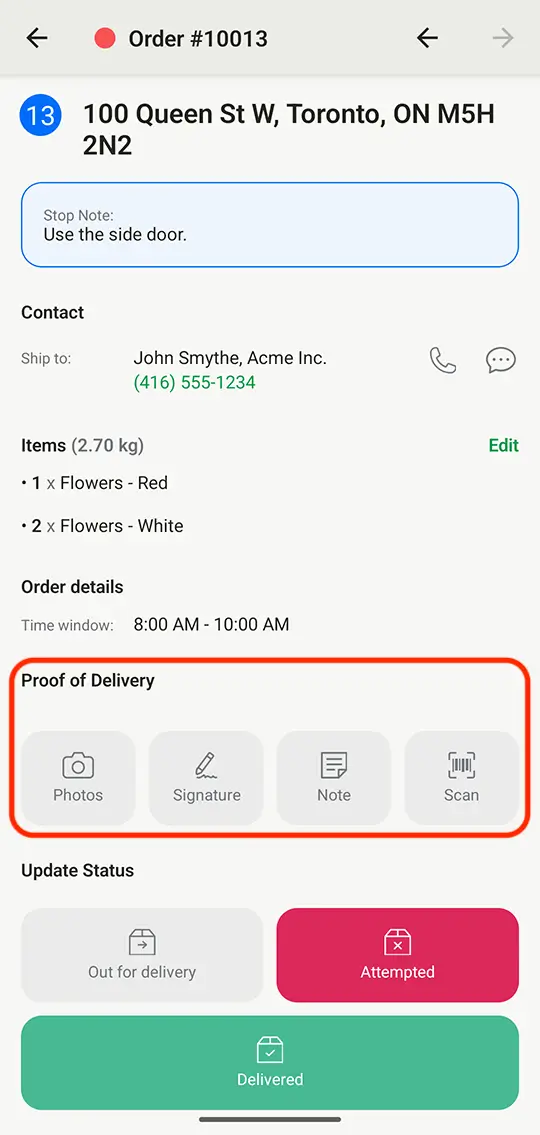
Before marking an order as Attempted or Delivered, you can optionally include Proof of Delivery via photo capture, eSignature, a custom note indicating any additional details about the delivery, or a barcode scan. These Proof items can be used for record keeping or additional confirmation for merchants, but can also be shared with your customers to provide additional peace of mind regarding their deliveries.
Simply tap the button for the type of Proof you'd like to upload, and the app will guide you through the rest:
We understand that many delivery routes take drivers into areas where there's limited or no internet connectivity. If you find yourself offline mid-stop, you can still use the Photos button to take your Proof photos, then tap Cancel to save it as a Draft:
Keep in mind that these drafts will only be retained as long as the app remains open. When you access this stop again, you'll see a message indicating you have pending Drafts Saved:
Once you're back online, tap the Photos button again, and you'll be able to use the Save button to upload Draft photos.
Further information
Still have questions about configuring and using the EasyRoutes Delivery Driver mobile app? Search our support portal for step-by-step configuration instructions; take a look at more articles on how to effectively use the Delivery Driver app; or reach out to the Roundtrip support team if we can answer any of your questions. Happy delivering!
Written by: Joe Snyder
About EasyRoutes
EasyRoutes is the AI-native delivery operations platform trusted by 5,000+ businesses across 75+ countries. Plan routes in seconds, dispatch drivers automatically, and delight your customers — from Shopify or any order source. Experience delivery operations that run themselves. Rated 4.8 stars and certified Built for Shopify.