Enable Local Delivery for your Shopify customers on checkout; collect and view custom delivery instructions; filter orders that match your Local Delivery settings; quickly add custom stops from outside of Shopify to your delivery routes; and take advantage of EasyRoutes' Shopify & third-party app integrations.
Welcome to EasyRoutes 101! This article will walk through the steps required to enable local delivery for your Shopify store, including setting a local delivery radius, configuring conditional pricing for local deliveries, and collecting delivery instructions from your customers for these orders. We’ll also explore how to add custom stops to local delivery routes for orders collected via manual methods or eCommerce platforms outside of Shopify, and explore EasyRoutes app integrations to supercharge your delivery routes.
Setting up Shopify local delivery
When you enable local delivery, customers who are within your delivery area will see it as a checkout option, making it easy for them to choose this method of delivery:
To get started, you'll need to set up local delivery in your Shopify Shipping and Delivery settings. This involves enabling the local delivery option for each location from which you offer local delivery. You can also choose to offer delivery within a set distance from your location, or for certain postal or ZIP codes, ensuring that you're only offering local delivery to customers who qualify based on their location.
To set up local delivery in your Shopify Admin, go to Settings > Shipping and delivery.
This section allows you to set up local delivery for every location that you wish to offer delivery services from. You can offer delivery restricted to certain area or postal codes, or you can offer local delivery within a certain radius.
In the section titled "Local delivery" click on the location you want to offer local delivery from.
If you have multiple locations, click on the "Show more" button to see all of your locations at once to easily manage their settings.
Check the box labeled "This location offers local delivery"
When you click this checkbox, a section will appear titled "Delivery area" where you can specify your delivery area using postal or area codes, or by radius from your location's address.
In the "Delivery area" section, set a delivery area by radius or postal codes.
To offer local delivery using postal codes, simply enter a list of postal codes that you want to deliver to, separated by a comma and a space. You can enter up to a maximum of 3,000 characters. If you want to include a range of postal codes, you can add an asterisk or a space after the initial characters to indicate the range.
To set a delivery radius, simply select your preferred unit of measurement and enter the maximum distance between your delivery location and your desired delivery area. It's important to note that the distance cannot exceed 160 kilometers or 100 miles. Additionally, you have the option to enable or disable the "Include neighboring states or regions" setting, which allows you to extend your delivery radius into nearby areas.
Optional: Set your minimum order price and delivery fee.
You have the option to set a minimum order price for customers who want local delivery. If you choose to set a minimum price, enter the amount in the "Minimum order price" field. Additionally, you can set a delivery fee that will be charged to customers who opt for local delivery. If you want to offer free local delivery, simply enter 0 in the delivery fee field.
Optional: Enter a message in the "Delivery information" section for customers to see.
Share details about your Shopify local delivery service with customers when they select this shipping option when checking out.
Save your settings to apply them.
You can also add multiple delivery zones to this location by clicking the "Create new delivery zone" link.
Shopify offers price-based rules that allow you to customize the cost of local delivery based on specific criteria. This can help ensure that your customers are charged a fair and accurate price for their local delivery orders.
When setting up your delivery zones as described above, you have the option of setting a minimum order value and a delivery fee. However, with price-based rules, you can add up to 3 additional rules to further customize the cost of local delivery. For example, you may choose to offer free delivery for orders over a certain amount.
The flexibility of price-based rules allows you to offer a more personalized delivery experience for your customers, while also giving you the ability to control your costs and increase your profits. With this feature, you can easily adjust your pricing strategy based on your business needs and customer preferences.
To set up local delivery in your Shopify Admin, go to Settings > Shipping and delivery.
In the section titled "Local delivery" click on the location you want to configure conditional pricing for.
To manage the settings of multiple locations, simply click on the "Show more" button to display all locations at once.
In the "Delivery zone" section click on the "Add conditional pricing" link.
When you click this link a new row of input boxes will appear below it allowing you to enter in a new order price and a delivery fee. If you type in some numbers, another row will appear beneath it for your next set of rules.
Enter in your conditional pricing rules.
You can click on the button with the trash can icon to delete any rows you no longer need.
Save your settings to apply them.
Collect custom delivery instructions for local delivery orders
Once you have local delivery set up as described above, customers who meet these conditions will be presented with the Local delivery option after entering their address in your store’s checkout page:
Any local delivery instructions included by a customer in their checkout form will be available to view from the Route page containing their order:
Delivery instructions will also be displayed prominently in the Delivery Driver mobile app for quick access by your delivery drivers while on their routes:
Filter orders to match local delivery conditions
Once local delivery orders start flowing into your Shopify store, EasyRoutes provides two quick methods to filter these orders - namely, by enabling Postal/ZIP code and/or Delivery method filters.
From your EasyRoutes Orders page, access the filter controls located below your active Route Options, and follow along below.
Filter by Postal or ZIP code
Select Postal code or ZIP code (depending on your location settings) from the Add filter menu. A text box will open for you to type in the postal codes that make up your delivery zone.
Input the same set of postal codes (using asterisks as wild cards again if necessary) that were used to set up your Shopify Local Delivery settings above:
Filter by Delivery method
From your Orders page filter controls, you can also select Delivery method from the Add filter menu. You'll see a list of any delivery methods that apply to your orders below. Use the checkbox to select Local Delivery to show only orders that have this delivery method selected on checkout:
When filtering by either or both of these methods, you’ll have quick access to only the orders that these filters apply to. For full details on using filters to streamline your route planning - including how to save these filter views to streamline future route planning - see EasyRoutes 101: Order Filters.
Create a local delivery route
From your filtered EasyRoutes Orders page, use the checkboxes beside any orders you’d like to route, and click the Add to map button that appears in the upper right-hand corner of the page. Have a quick look at your orders on the map, and click Create route in the top-right corner of the page to generate your local delivery route.
Add custom orders collected outside of Shopify to a route
If your store also offers local delivery for orders placed outside of Shopify (whether by phone or email, in a physical storefront, or via another eCommerce platform), EasyRoutes offers two methods to import these orders and add them to your already created routes.
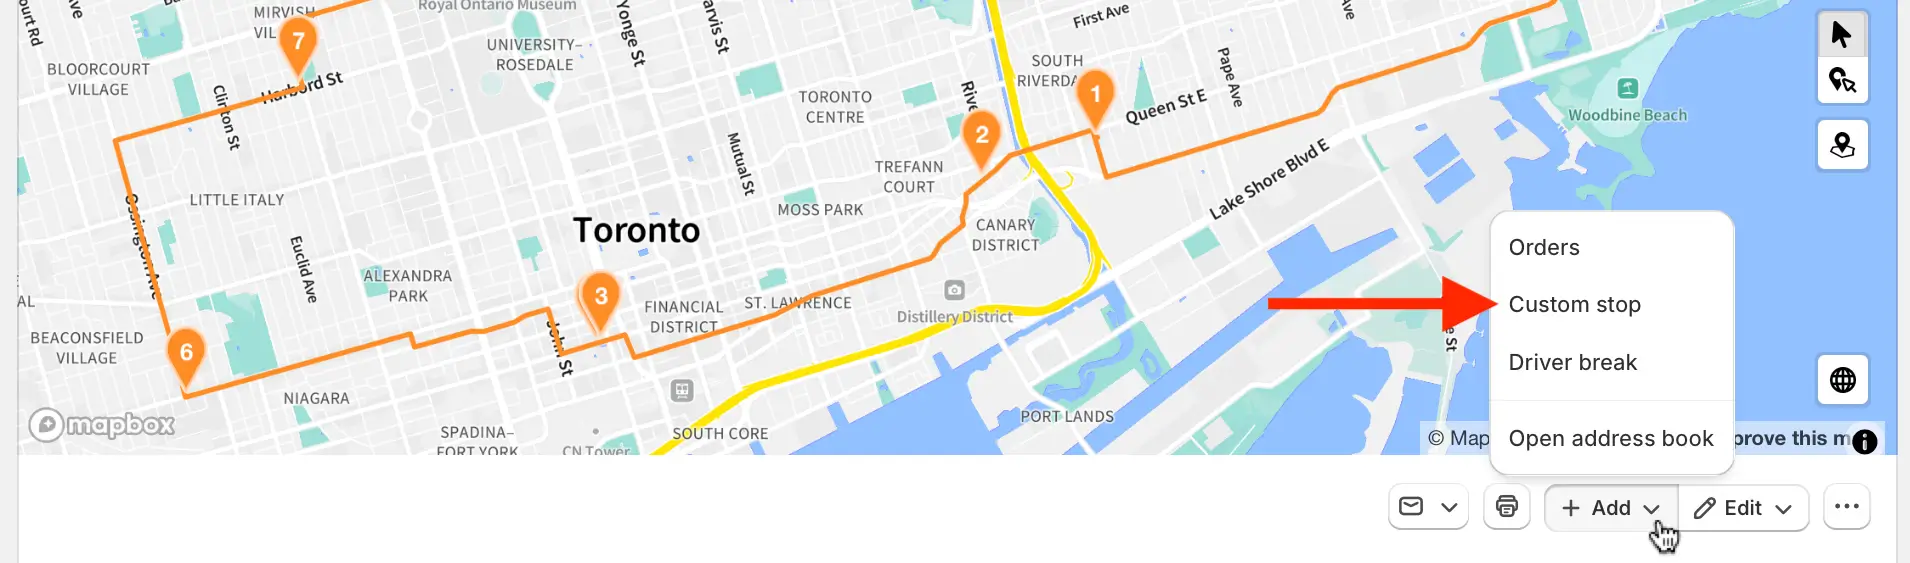
Add a custom stop
From any Route page, access the + Add menu found below the map, and select Custom stop:
This will open a form where you can input your custom stop and order details - as long as any custom stop contains an address, you can add it to a route. Input any relevant stop/order details before clicking Save in the top right corner to immediately add this custom stop to your route.
Make sure the stop details look correct in your route page and on the map, and click Save again in the top right corner to save these additional changes to your route; if things don’t look quite right, you can also click Discard here and start adding the custom stop again with different details.
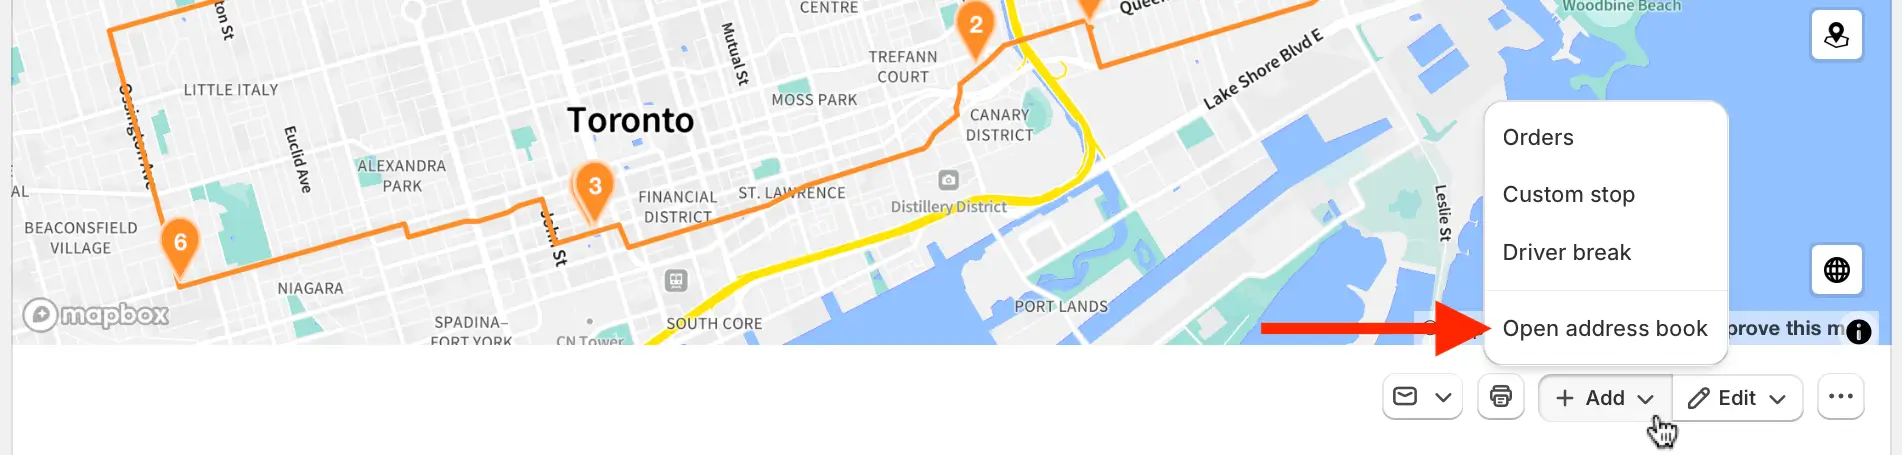
Import stops via Address Book or CSV upload
If you find you're delivering to the same custom stops frequently, you can use the Address Book to save custom stop details permanently for streamlined future deliveries.
From any Route page, access the + Add menu found below the map, and select Open address book:
The address book panel will open, containing any custom stops you've added to the Address Book in the past. Simply click the New address button in the bottom left and input relevant stop/order details before clicking Save in the top right corner to immediately add this custom stop to your Address Book.
Use the checkbox(es) beside saved custom stops to select which stops you'd like to route, before clicking Add to immediately add the selected order(s) to your map:
Make sure the stop details look correct in your route page and on the map, and click Save again in the top right corner to save these additional changes to your route; if things don’t look quite right, you can also click Discard here before opening the Address Book again and correcting any necessary details.
For full information on working with the Address Book and CSV imports for custom stops specifically, including sample spreadsheets formatted for EasyRoutes importing, see the Address Book and CSV import workflows support articles.
EasyRoutes 🤝 Shopify integrations
While EasyRoutes allows you to plan optimized delivery routes, manage your drivers and share delivery updates with your customers all in one place on Shopify, it's also compatible and deeply integrated with the rest of your Shopify store, apps, and tools for running your business:
Subscriptions: EasyRoutes will read the latest fulfillment from a subscription order created by apps using the Shopify Subscriptions API, including Appstle, Bold, Recharge, and more. Keep your customers coming back for more and deliver your subscription orders with EasyRoutes!
Printed Packing Slips and Labels: Use EasyRoutes' native printed materials, or take advantage of our Order Printer and Order Printer Pro app integrations.
Customer and Order Tags: You can persist information for a customer using the Customer note and tag feature on Shopify, which integrates directly with EasyRoutes. Display these notes in your Shopify admin, on printed route materials, and as a quick reference for drivers in our mobile app.
Delivery Date & Time Pickers: Whether you're using Zapiet, Bird, Buunto, Pickeasy or many other popular date and time picking apps, EasyRoutes is integrated! We pull data from many leading apps to ensure EasyRoutes knows exactly when customers want their orders delivered, and plans the most efficient routes accordingly.
Product Options: Do you use product options (via Bold Product Options, Infinite Options, or others) for capturing specific details for orders that you're delivering? Whether a gift note, a delivery date, or a specific detail that isn't captured in a product variant, EasyRoutes captures this data and will display it under the Item Properties column in your order or route pages.
Tracking Links & Notifications: EasyRoutes provides a Customer Tracking Link when we create a fulfillment on your order, with notifications communicating the latest delivery status, ETA and any proof of delivery. For full details on configuring these items for your delivery customers, see EasyRoutes 101: Customer Communications.
For a current list of Shopify apps that EasyRoutes is directly integrated with, see the third-party integrations page on the Roundtrip website, or visit this support article for further information on how different types of integrations work with EasyRoutes.
Further information
Still have questions about using EasyRoutes to manage your local deliveries on Shopify? Search the EasyRoutes support portal for all your EasyRoutes answers at any time, or reach out to the Roundtrip support team if we can help with any other questions or concerns. Happy delivering!
Written by: Joe Snyder
About EasyRoutes
EasyRoutes is the AI-native delivery operations platform trusted by 5,000+ businesses across 75+ countries. Plan routes in seconds, dispatch drivers automatically, and delight your customers — from Shopify or any order source. Experience delivery operations that run themselves. Rated 4.8 stars and certified Built for Shopify.