Discover how EasyRoutes' Zapier integration unlocks no-code automations for your delivery operations, including automated order imports, delivery status-based internal team notifications, external tool sync, and more.
Welcome to EasyRoutes 101! In this article, we'll explore EasyRoutes' Zapier integration: a no-code way to automate the flow of order data into EasyRoutes from just about anywhere, and to push delivery updates from EasyRoutes out to the apps and tools your team already relies on. We'll cover what Zapier is and how it works alongside EasyRoutes, identify which delivery operations stand to benefit most from this integration, walk through setting up your first automated order import, and round things out with a quick survey of additional Zapier-powered workflows your delivery operations can take advantage of.
What is Zapier — and how does it work with EasyRoutes?
Zapier is a no-code automation platform that connects more than 8,000 different apps and services to one another, allowing you to build automated workflows (called "Zaps") between them — without writing a single line of code. Each Zap is built from two basic ingredients: a trigger (an event in one app that kicks off the workflow) and one or more actions (events that the Zap performs in response).
EasyRoutes' Zapier integration provides two instant triggers and one core action that can be combined with any other Zapier-supported app:
Route Updated (trigger) — fires whenever a route is created, updated, deleted, etc., with topic-level configuration so you can subscribe to only the route events you care about.
Stop Status Updated (trigger) — fires whenever a stop's status changes (for example, ready for delivery, out for delivery, attempted, or delivered).
Import Stop (action) — imports a stop directly into EasyRoutes for route planning, with full support for line items, customer details, delivery dates, addresses, attributes, tags, priorities, and more.
With these building blocks, you can connect any of Zapier's 8,000+ apps to your EasyRoutes account — pulling orders in from outside sources, pushing delivery updates to internal tools, syncing data to spreadsheets and calendars, sending automated notifications to your team, and much more. Users with more advanced needs can also tap directly into EasyRoutes' raw webhooks API via Zapier — more on that at the end of this article.
Who is the EasyRoutes + Zapier integration for?
While EasyRoutes is built to integrate deeply and natively with Shopify, Zapier opens the door for a much broader set of delivery operations to take advantage of EasyRoutes' route planning, dispatch, tracking, and customer communication features. The Zapier integration is a particularly good fit for:
Stores selling on non-Shopify eCommerce platforms like BigCommerce, Wix, Square, Ecwid, Stripe, or Xero, who want to automatically import their orders into EasyRoutes for routing and delivery.
EasyRoutes for Web users whose orders flow in from spreadsheets, online forms, CRMs, or other non-eCommerce sources.
Multi-store Shopify operators who want to consolidate orders from multiple Shopify storefronts into a single EasyRoutes installation for unified dispatch and delivery management.
Operations teams and dispatchers who want their internal tools (Slack, Microsoft Teams, Gmail, etc.) to receive automatic notifications when delivery milestones occur.
Anyone wanting to sync EasyRoutes data with external reporting, scheduling, or analytics tools without writing custom code or maintaining their own API integration.
If you're using EasyRoutes alongside any other software your business relies on, there's a good chance Zapier can save your team time and reduce manual data entry.
Connect EasyRoutes to Zapier
Before building any automations, you'll need to connect your EasyRoutes account to Zapier. This is a one-time setup that uses an EasyRoutes Client ID and Secret Key for authentication.
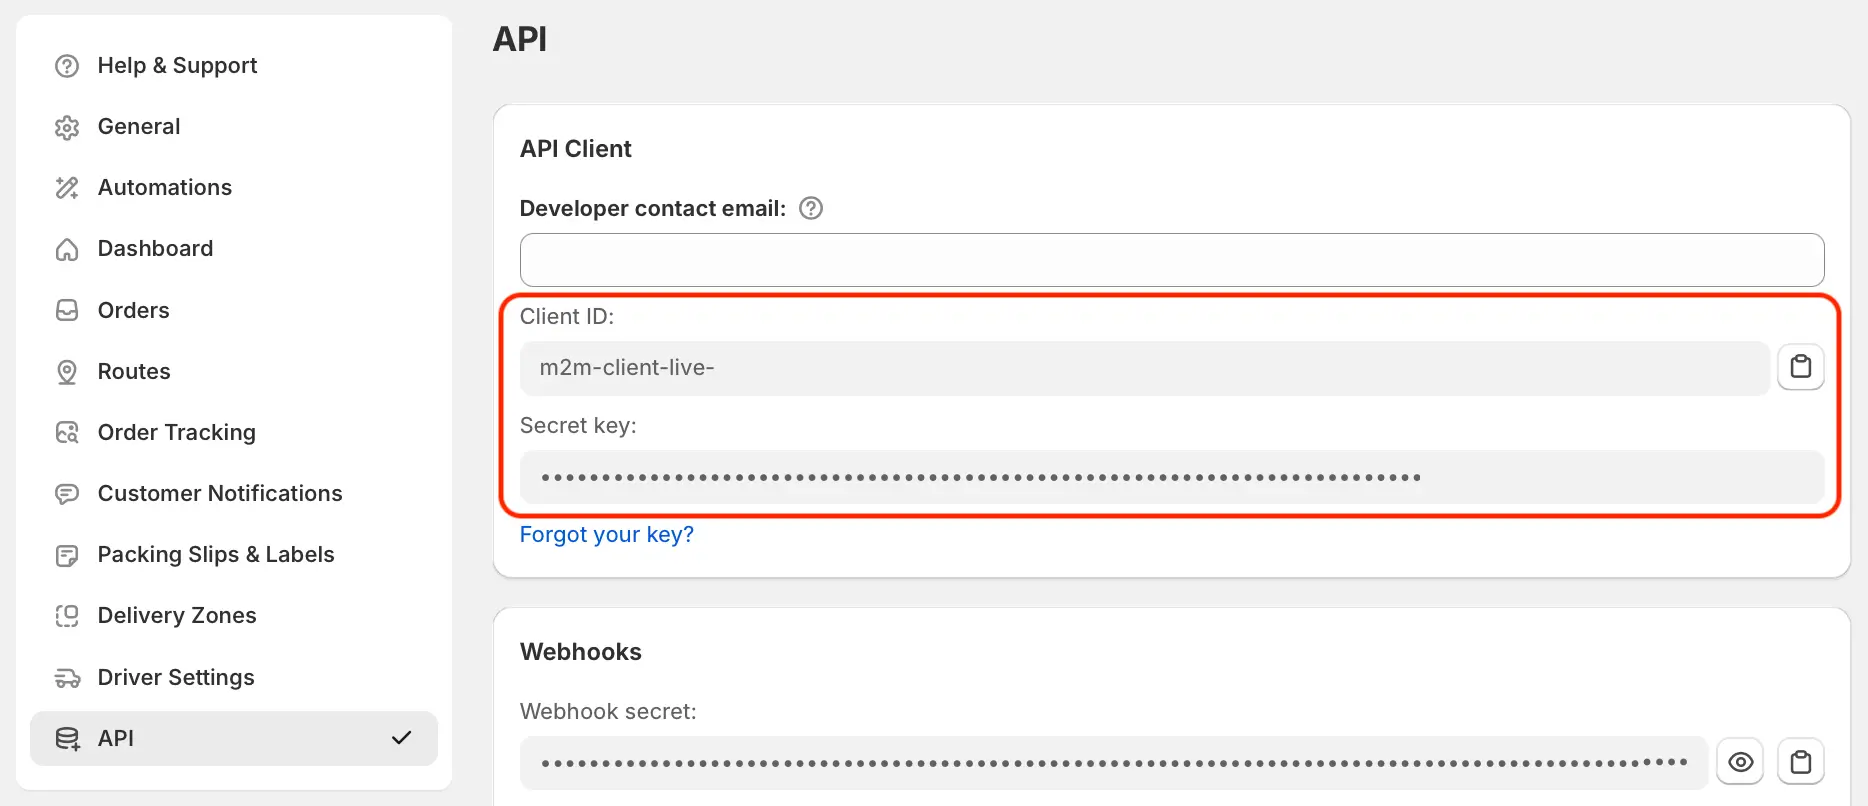
1) Locate your Client ID and Secret Key.
After logging in to your EasyRoutes account, navigate to your EasyRoutes Settings > API tab. You'll find your Client ID and Secret Key here — copy these values, as you'll need them in the next step.
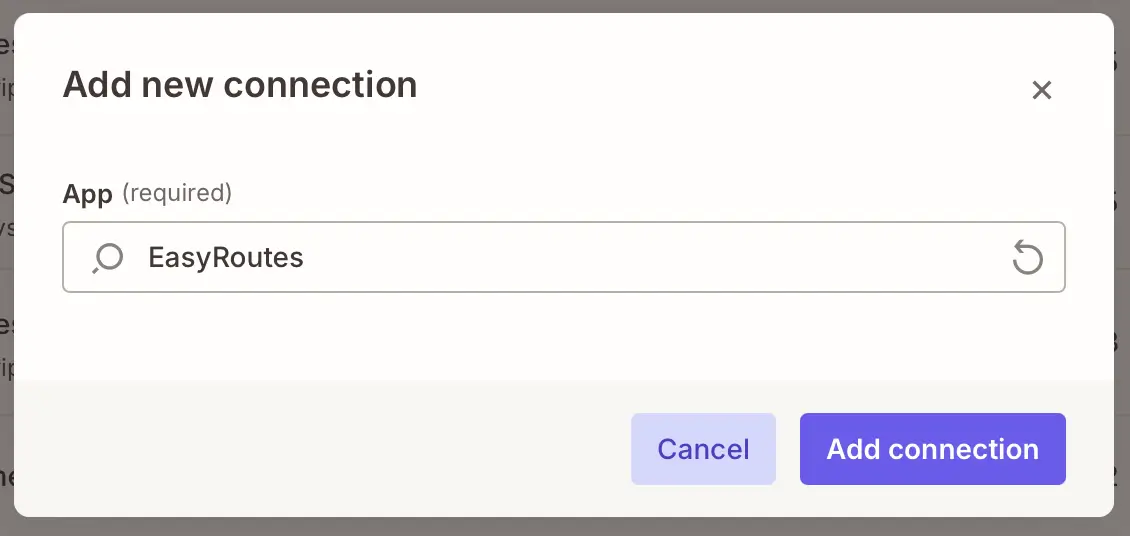
2) Add EasyRoutes as an App Connection in Zapier.
In your Zapier account, select App Connections from the sidebar menu, then click the Add connection button in the upper right-hand corner. Type "EasyRoutes" into the App search field and click Add connection.
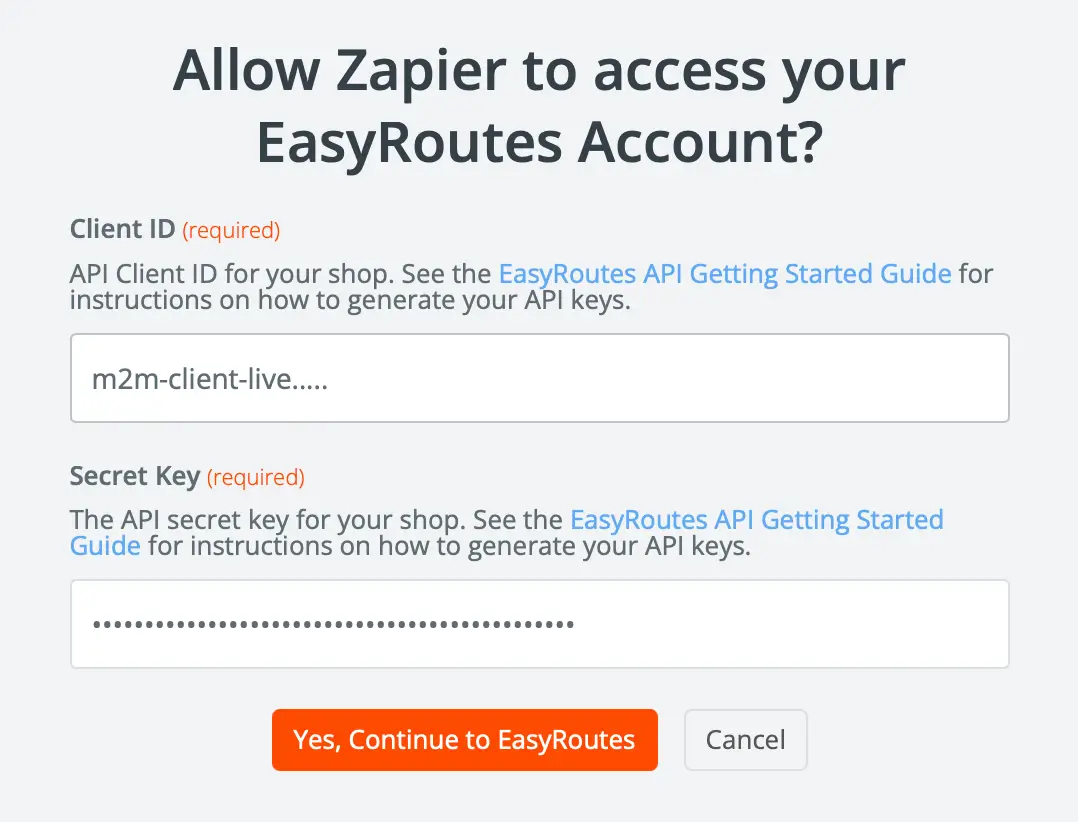
In the window that appears, paste in the Client ID and Secret Key you copied from your EasyRoutes Settings, and confirm. Your EasyRoutes account is now connected to Zapier and ready to use in any Zap.
The most common use of EasyRoutes' Zapier integration is automating the flow of new orders into EasyRoutes from a source that isn't natively integrated. To illustrate the setup, we'll walk through an example using Google Sheets as the order source — a flexible starting point that works whether you're collecting orders directly via a spreadsheet, exporting from a CRM or order management tool, or staging orders before route planning. The same general approach applies to any other Zapier-supported app or platform.
Build your Zap
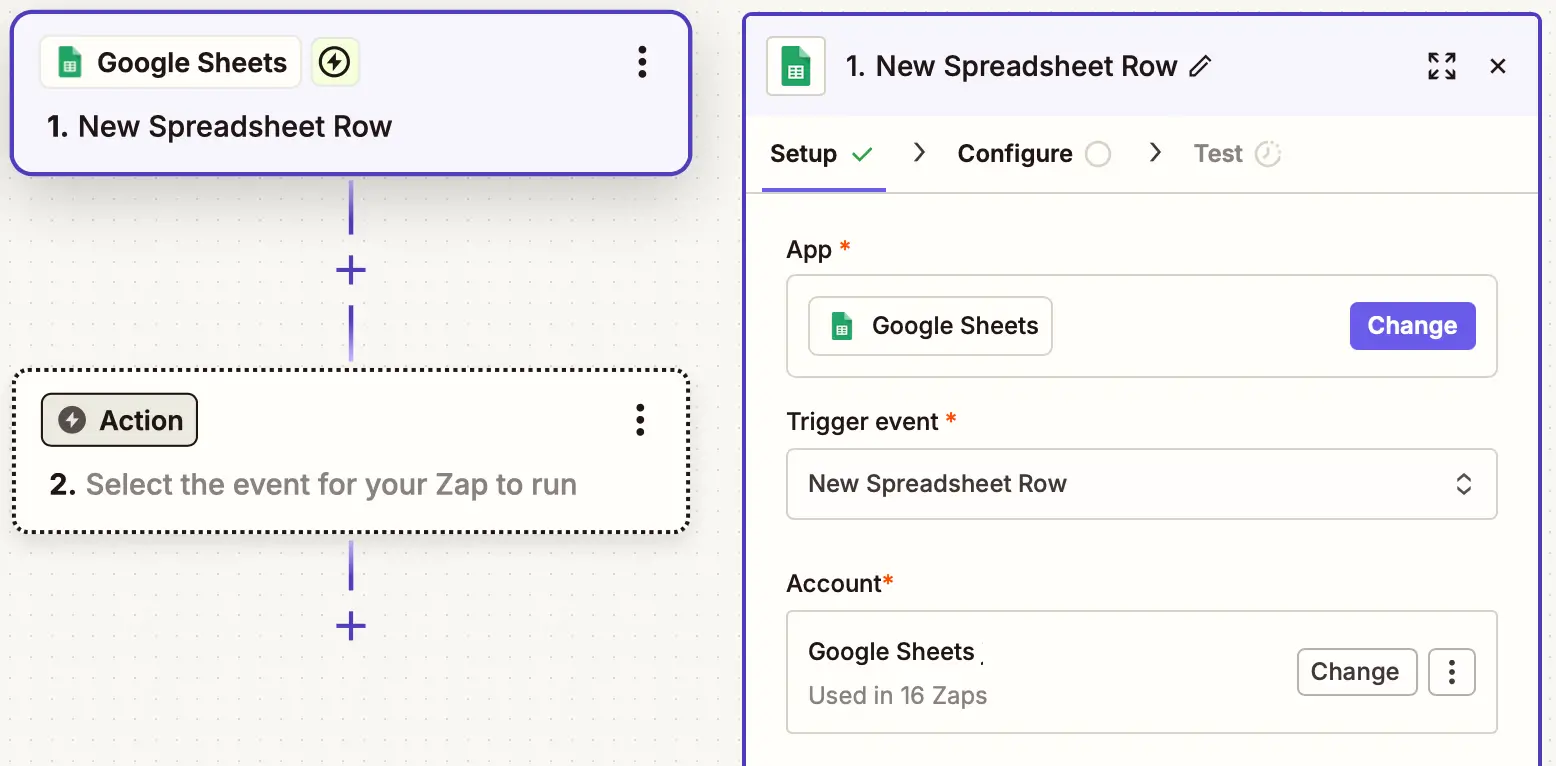
1) Create a new Zap and choose a trigger.
In Zapier, select + Create > Zap from the left navigation menu to start a new Zap. Click the Trigger step, search for and select Google Sheets, and choose New Spreadsheet Row as the trigger event. Connect your Google account and select the spreadsheet and worksheet that contains your order data.
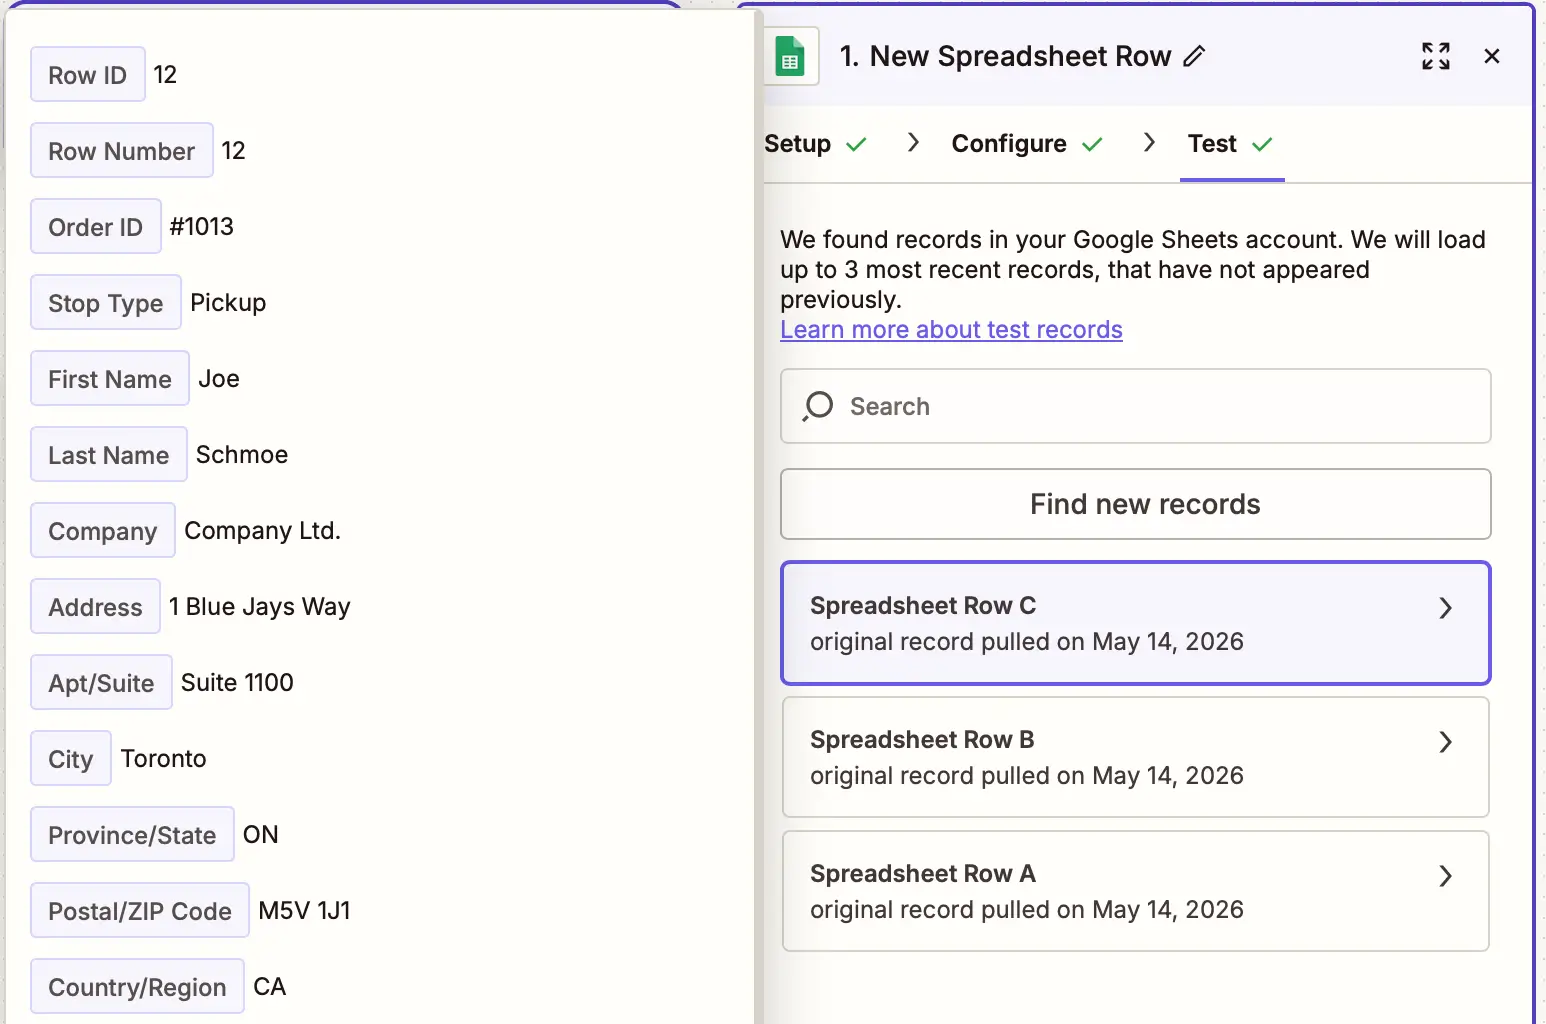
Test the trigger and select a sample row to use for the next step — this gives Zapier the data it needs to map fields onto EasyRoutes' Import Stop action. You'll see the sample data displayed in the panel that appears to the left of the configuration options.
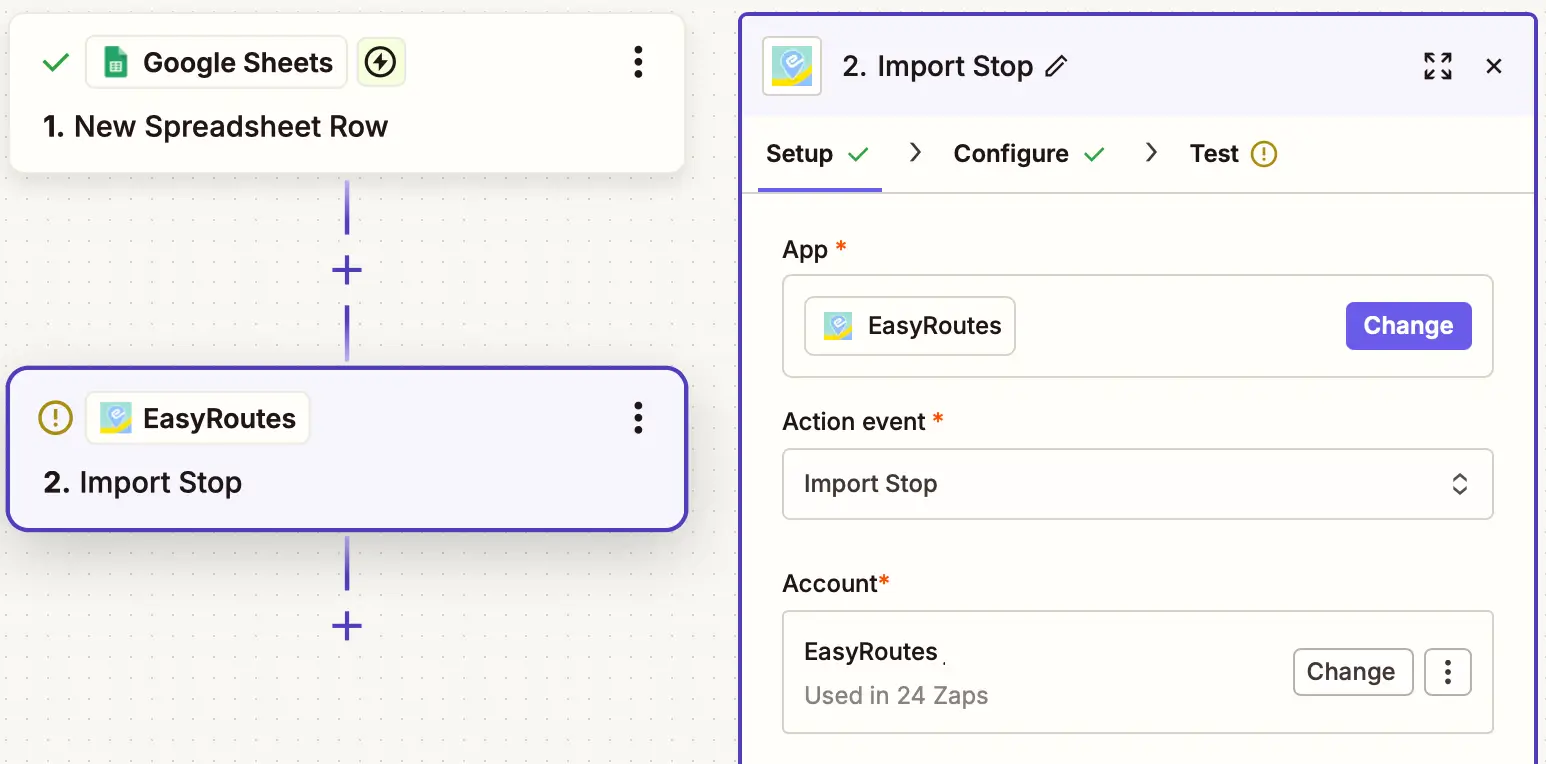
2) Add the EasyRoutes "Import Stop" action.
Click the + below your trigger to add an action step. Search for EasyRoutes, select it, and choose Import Stop as the action event. Connect your EasyRoutes account if you haven't already (using the App Connection you set up in the previous section).
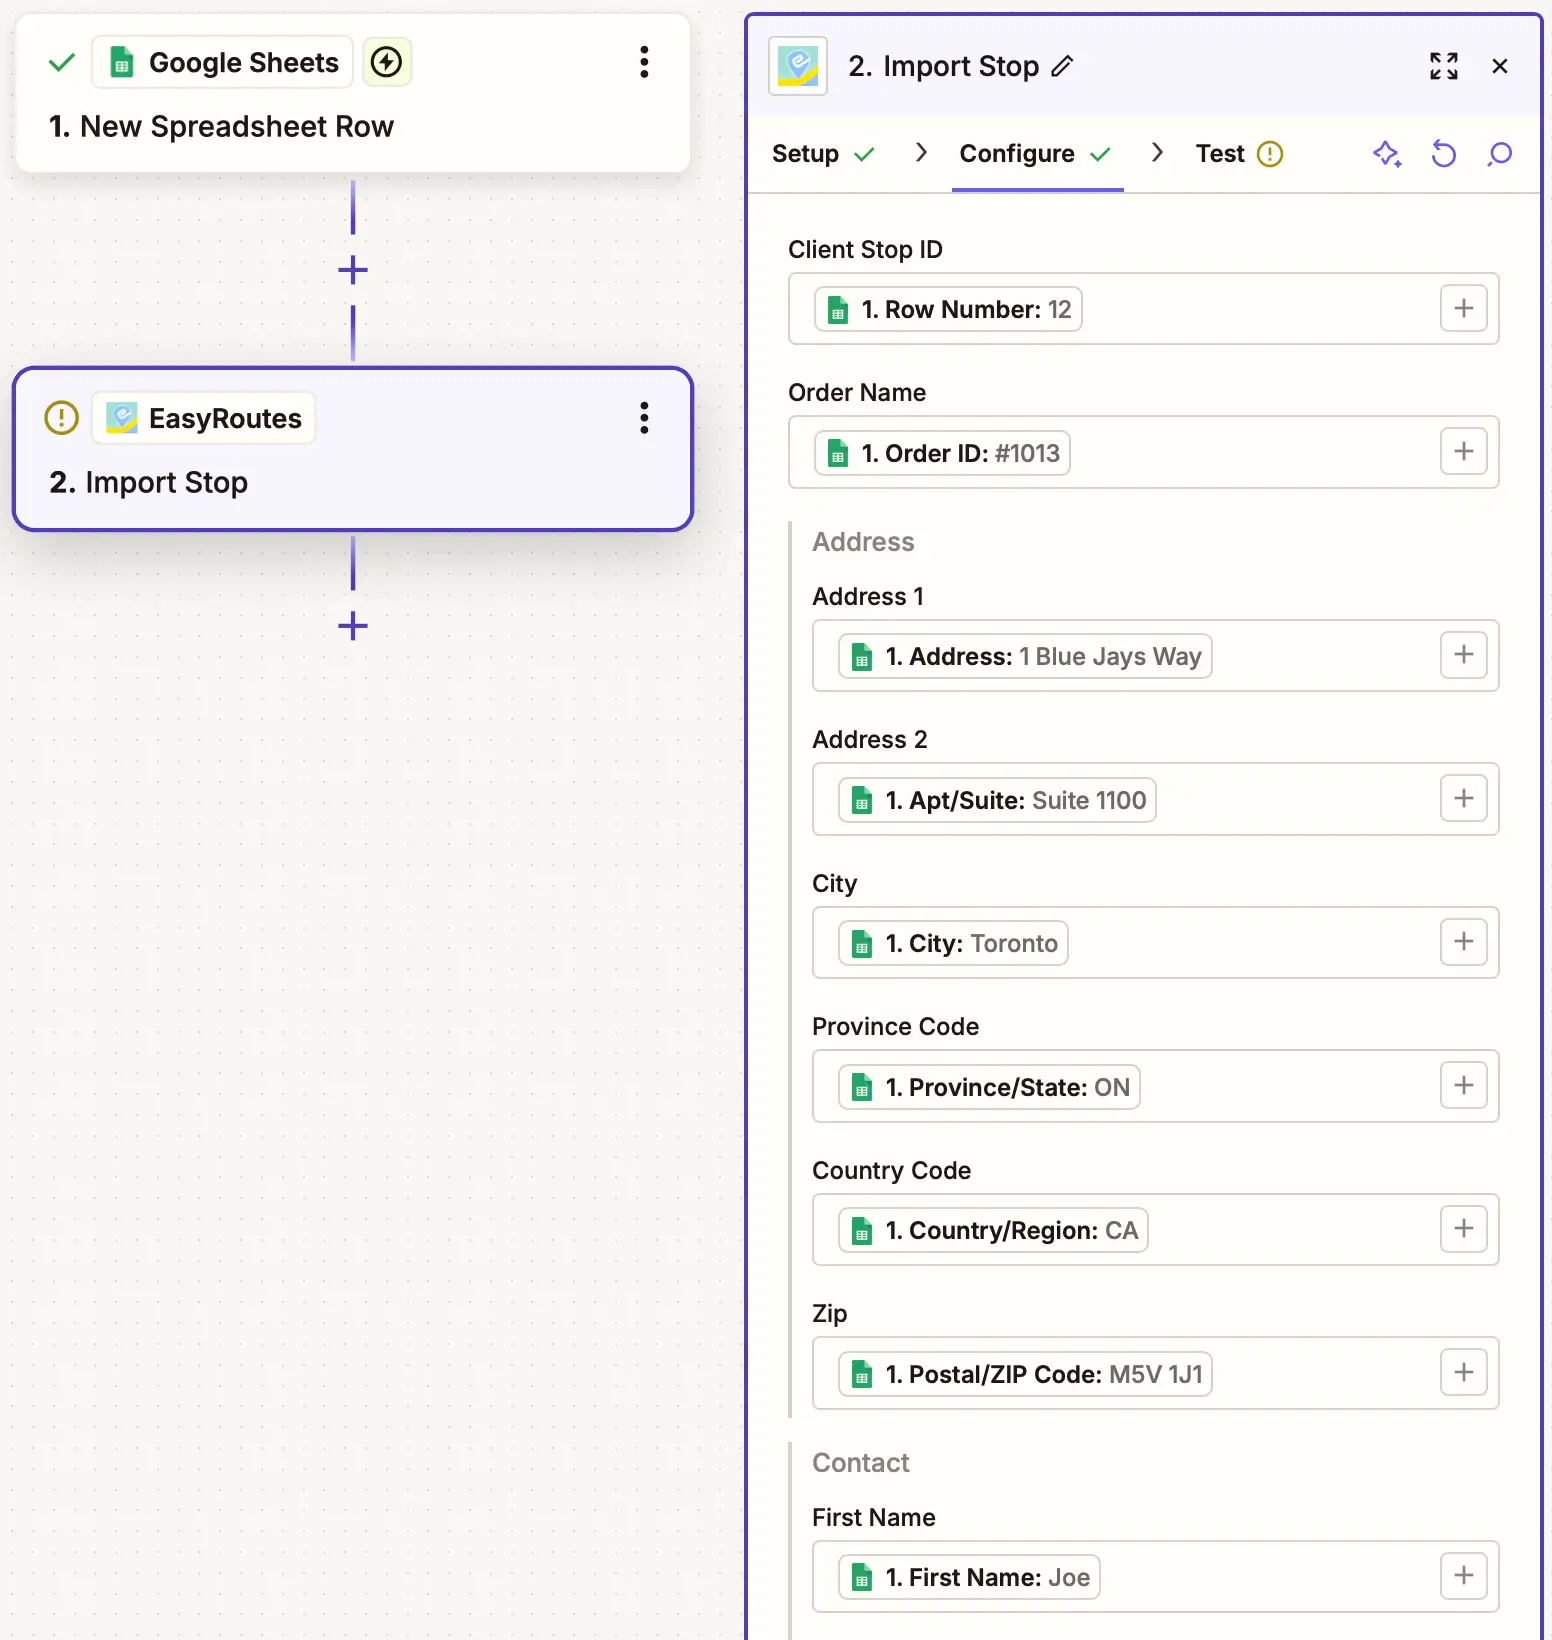
3) Map your spreadsheet columns to EasyRoutes fields.
The Import Stop action exposes a comprehensive set of fields for the order being imported. At minimum, you'll want to map an address (Address 1, City, Province Code, Country Code, Zip) so EasyRoutes can place the stop on the map. Additional fields you'll commonly want to map include:
Client Stop ID — a unique identifier for the order from your source system (for example, an order number from your spreadsheet). This is invaluable later if you need to look up or update the matching record in your source system.
Order Name — the order number or label that appears in EasyRoutes.
First Name, Last Name, Company, Phone, Email — customer contact information.
Note — internal notes or delivery instructions.
Delivery Date — the scheduled delivery date for the order.
Tags — useful for filtering and grouping related orders in EasyRoutes.
Item Name, Quantity, Grams — order line items (see below for multi-item handling).
4) Format multi-item orders as line items (optional).
If your orders contain more than one item per order, those items need to be sent to EasyRoutes as a properly formatted array (line items). When importing from sources like Shopify, this formatting happens automatically; when importing from spreadsheets and many other sources, you'll need to add an extra Formatter by Zapier step before the Import Stop action.
In a Formatter step, select the Utilities > Line Itemizer (Create/Append/Prepend) option and configure it to create an array containing your item name, quantity, and weight (in grams) variables. The Formatter's array output can then be mapped to the corresponding line item fields on the Import Stop action.
For full details — including a full example with sample data — see the Working with order line items section of our Common Zapier Integrations support article.
5) Test your Zap and turn it on.
Use Zapier's built-in test tool to send a sample row through to EasyRoutes, then confirm the order appears as expected on your EasyRoutes Orders page. Once you're happy with the result, publish the Zap — every new row added to your spreadsheet will now flow automatically into EasyRoutes as an importable order, ready to be added to a route.
Start from a pre-built template
Rather than building from scratch, you can save setup time by starting from one of the pre-built EasyRoutes Zap templates on Zapier. Templates exist for a wide range of common sources — including Google Sheets, BigCommerce, Wix, Square, Stripe, Ecwid, Xero, and more — with common field mappings already filled in.
Beyond order imports: more ways to use Zapier with EasyRoutes
Importing orders is the most common starting point, but Zapier opens up many more automation opportunities for delivery operations. Here are some of the most useful workflows our customers build, each linked to a more detailed support article where applicable.
Send internal staff notifications on delivery events
Use the Stop Status Updated or Route Updated triggers to automatically notify your team when delivery milestones occur — whether by email, Slack, Microsoft Teams, SMS, or any other Zapier-supported channel. Common use cases include alerting dispatchers when a stop is marked as Delivered or Attempted, or notifying staff when a route is completed.
Auto-fulfill Shopify orders when EasyRoutes marks them as Delivered
If you'd like Shopify fulfillments to update automatically based on EasyRoutes delivery status, you can build a Zap that listens for the Stop Status Updated trigger, filters for the Delivered status, and updates the corresponding Shopify order. See Fulfill Shopify order when EasyRoutes marked as Delivered for the full configuration.
Sync delivery data to spreadsheets
Push delivery details — completed stops, route summaries, customer ratings, and more — into Google Sheets or another spreadsheet tool for reporting and analytics. This is particularly useful for delivery teams that want to combine EasyRoutes data with information from other sources for custom reporting. Find more details in the Common Zapier Integrations article for templates and examples.
Add scheduled routes to Google Calendar
Give your dispatch team and drivers calendar visibility into upcoming routes by automatically creating Google Calendar events whenever a route is scheduled or updated in EasyRoutes. Pre-built Zap templates for this workflow are available on the EasyRoutes Zapier integrations page, or consult this support article for full details on setting it up from scratch.
Update Shopify orders with external delivery data
If you collect delivery dates, time windows, or other order metadata using a tool outside Shopify (such as a form builder, CRM, or scheduling app), you can use Zapier to push that data back to the corresponding Shopify order's Additional details section — making the data available for filtering, route planning, and order automation rules within EasyRoutes. The walk-through and a starter template are available in the Update Shopify order for EasyRoutes data access section of our Common Zapier Integrations article.
Connect to anything else in your stack
Beyond these examples, the EasyRoutes + Zapier integration can connect to virtually any tool your business uses — CRMs, accounting tools, helpdesks, project management platforms, and more. Browse the full list of compatible apps and pre-built templates on the EasyRoutes Zapier integrations page for inspiration.
Advanced: webhook-based integrations
Most Zapier workflows can be built using EasyRoutes' native triggers and the Import Stop action covered above. For users who need access to data points or events not exposed by those native components, EasyRoutes' raw webhooks API can be tapped into directly via Zapier's Catch Hook or Catch Raw Hook triggers — typically requiring a paid Zapier subscription, and a more technical setup.
This advanced approach is well-suited for scenarios like extracting customer ratings from a STOP_UPDATED webhook, parsing specific stop details when multiple stops are updated simultaneously, or working with payload fields not surfaced by the native triggers. For full setup steps and worked examples, see Integrate EasyRoutes Webhooks with Zapier (Advanced).
Further information
Still have questions about using Zapier with EasyRoutes? Search the EasyRoutes support portal for all your EasyRoutes answers at any time, or reach out to the Roundtrip support team if we can help with any other questions or concerns. Happy automating!
About EasyRoutes
EasyRoutes is the AI-native delivery operations platform trusted by 5,000+ businesses across 75+ countries. Plan routes in seconds, dispatch drivers automatically, and delight your customers — from Shopify or any order source. Experience delivery operations that run themselves. Rated 4.8 stars and certified Built for Shopify.